
After making a tool the hard way, one has extra appreciation when finding a simple way. My last post to this blog was about a pot chuck for my Sherline lathe that used the Morse taper of the lathe headstock for tightening. It worked, but wore out after only a few parts because the material was too soft, and would yield in the area of the taper.
So here is the simple the simple pot chuck. It is just a ring with
1. a recess of the correct diameter to hold the part,
2. a punch mark to align with jaw “A” of my 3 jaw chuck, and
3. a sawn slot.
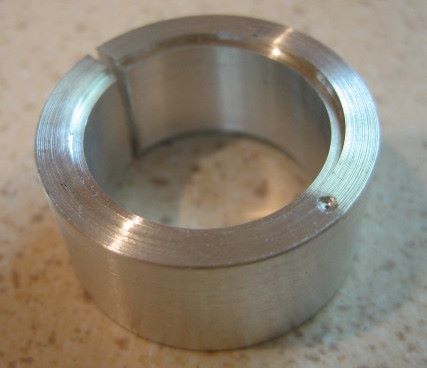
This chuck is tightened by being held in the 3 jaw chuck, so wear should not be a concern, despite the soft material (2011 aluminum).
Holding a homemade chuck in a 3 jaw chuck does not sound like a very promising start, since 3 jaw chucks do not center material very well. But the punch mark shows me where to locate jaw A. Jaw A may not be at the same distance from rotational center as the other two jaws, but the error among the 3 jaws is repeatable. So if we cut the recess with the punch mark aligned on jaw A and then re-establish the alignment whenever the chuck is used, we get much improved centering.
The recess on the first side of the chuck is only 0.025 deep, so I can use it to finish a thrust washer that is 0.031 thick.

The second side of the chuck has a deeper recess which I use when holding thicker parts.

More details on this type of chuck can be found here. When I first found this page a few weeks ago, it did not make sense to me. I was distracted by the pictures and thought that it had 3 parts. Then Reelsmithing brought up the subject, so I took a second look, read the text, and saw the light.

goood idea just in time i a qm makeing a cap for my engraveing machine this came ai the right time
Nice pot chuck! We featured it in a recent HomemadeTools.net newsletter, properly credited to you and linked of course: http://mailchi.mp/homemadetools/lathe-chuck-brake-flashlight-bore-lathe-wheel
I hope we’ve been able to send you lots of visitors. Cheers 🙂