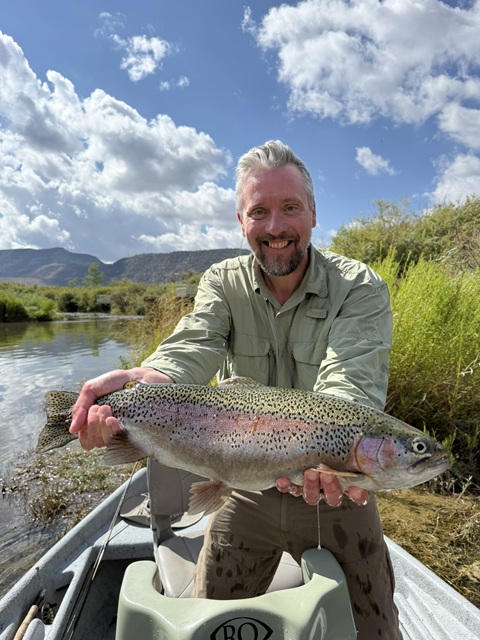
My son-in-law and I recently spent a few days on the San Juan River at Soaring Eagle Lodge, and had a great time with guide Brad “Big Mac” McCarville. We had a lot to learn about nymphing with flies as small as #26, but also had to learn how to hold a fish for a picture.
At first, our efforts were poor.
But Brad patiently coached us.
By trip end, we were doing much better.
Note to myself: Rod Echo Carbon XL 590-4, Reel Reddington Run
Bamboo rod makers: have you abraded a male ferrule just a bit too much? A quick fix may be to slightly shrink the mating female. I have been making a ferrule shrink tool for several years now, and I think that I have a good design. Click on the “Ferrule Shrinking” tab just below the headline photo on this blog for more details. Anyone with a home shop lathe and mill can easily make one, although I continue to make and sell them. In this post, I am providing construction details so that the design is not lost.
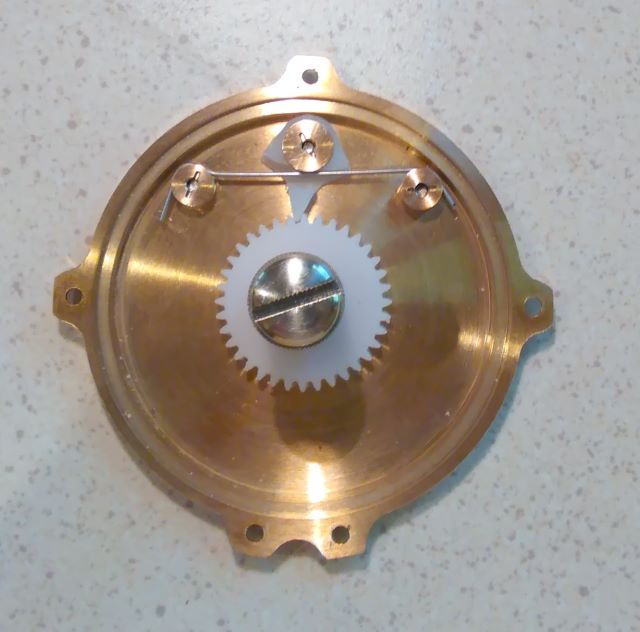
First make blanks for the front and rear aluminum plates. These are 2-5/8 diameter, 3/8 thick, and have a 5/8 diameter through hole at the center.
Clamp the two plates together on the mill table so that all holes can be “match drilled”.
Machine the plate details according to the drawing below. I have been drilling the two holes of 5/16 diameter and the three holes for assembly screws. The only actual milling tasks are plunging the 21/64 counterbores and cutting the slot.
Make 3 spacers, 3/8 diameter, 0.355 long, and with a #10 drill (0.194) through hole.
Press 5/16 dowel pins (1 inch length) into three ball bearings, 1603-2RS. Do not allow press forces on the balls; make a sleeve of 5/16 I.D. and 0.33 length to support the inner race during the press.
Assemble plates, spacers, and bearings with three screws, #10-32 x 7/8 socket head. I have been placing washer shims (9/16 OD, 5/16 ID, .003 inch thick) on both sides of the two fixed bearings. These shims prevent bearing outer races from dragging on the end plates. They are not strictly needed; most assemblies will operate well without them.
Grind the tips of the two radial screws (#10-32 x 1) flat; these bear on a dowel pin.
Back in 2008/2009, I made several “tuna can” reels. The plans are elsewhere in this blog (search for “Reel 37 Plans”). The second owner of a pair of these was concerned that there was no line guard to protect the line from rubbing on an inside edge of the top pillar, so I fabricated some for him from bronze.
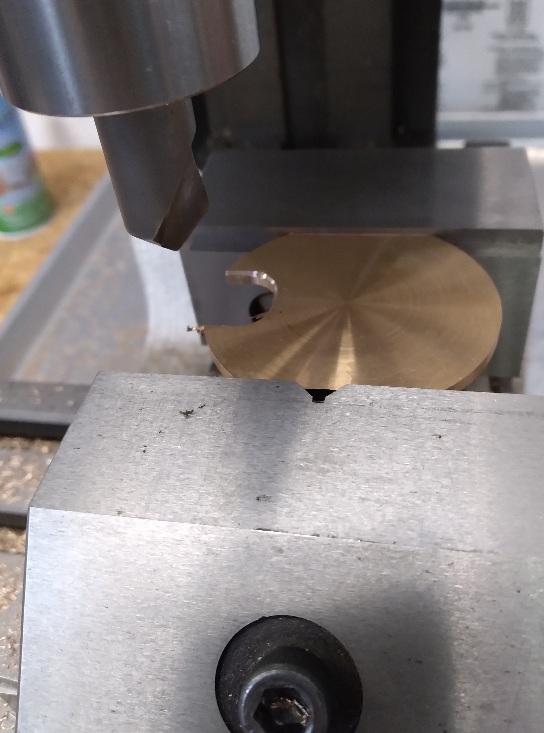
Machining small parts can be tricky; here is how I did these.
Start with an oversize material blank and cut the inside notch with a large diameter end mill.
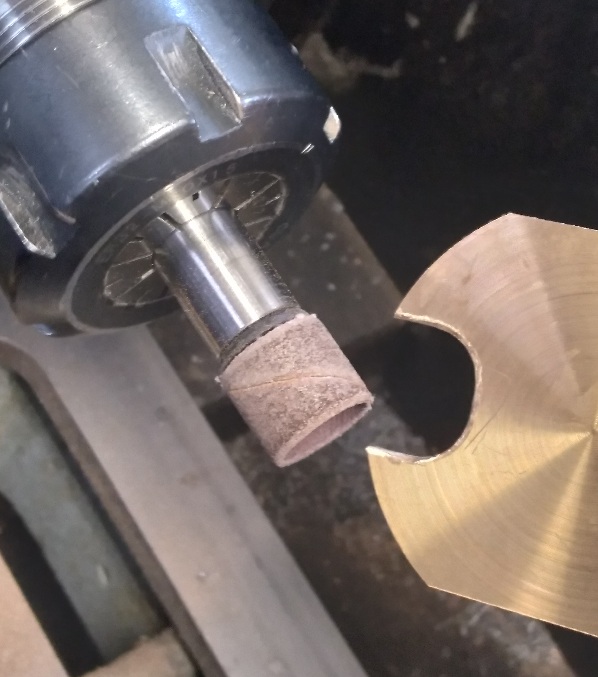
Then use a conical cutter to make a slight bevel.
Next, use a sanding drum to abrade the bevel into an arc. It is good to have the oversize blank to hold onto while sanding.
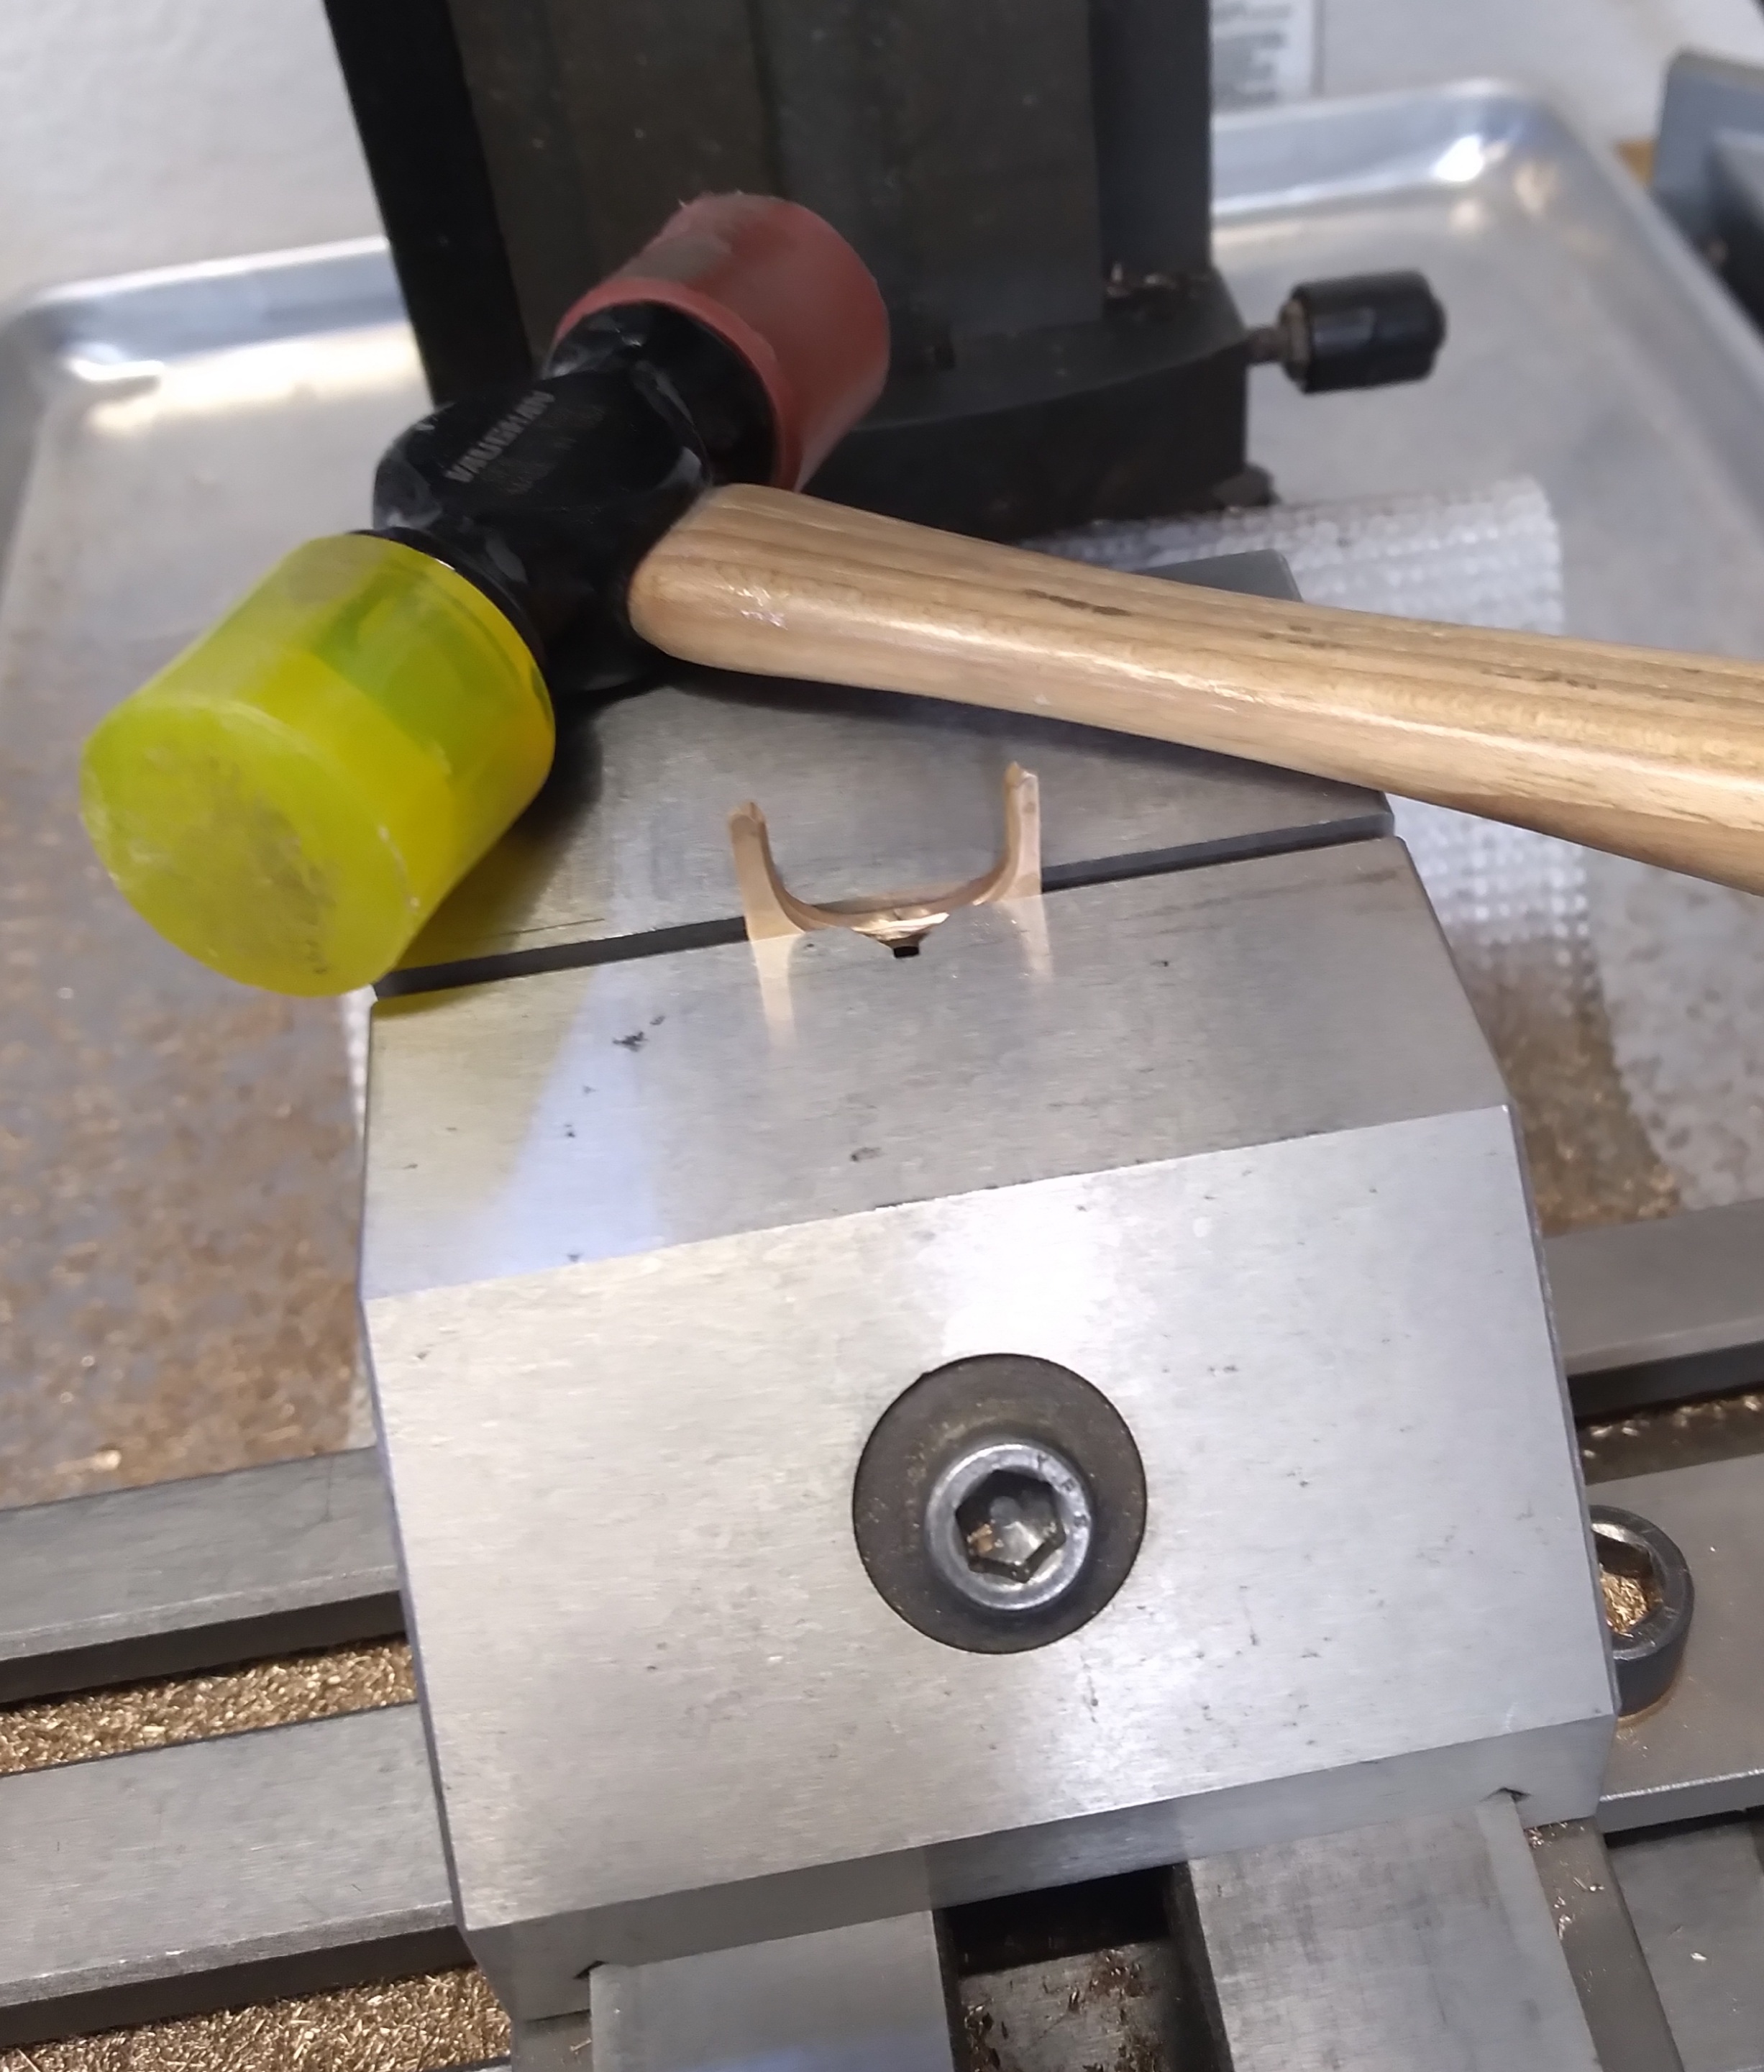
Then do the rest of the profiling and finally cut the part free of the blank.
All I have done so far is make a flat pattern; it does not conform to outer diameter of the reel frame. I don’t have a 4 axis CNC mill. So the last bit of shaping is bending, I used a vise and a mallet to tap it into the final arc.
While forming in this way, the two arms of the part tend to splay outwards. They can be brought back by use of the vise.
Here is a bronze casting in the form of a rectangular solid bar, and a reel foot made from this material.
Bronze alloy C954 is supplied as a casting, made by the “continuous casting” method. The cast bar is quite uniform and is oversize; this 1/4 x 3 inch nominal bar measures 0.34 x 3.07. That is so it will clean up to at least 0.25 x 3.00. In my experience, it would have clean surfaces at 0.32 x 3.05. A bar of nominal 2 – 1/2 width is easily wide enough to make a 2.50 long reel foot.
C954 machines well, having a machineability index of 70 (ref. brass C360 at 100). But there is a problem using it for reel parts: it has some porosity. Below are the outcomes of starting six reel feet. Three of them are useable and have no surface flaws, once I sand them. But three others have small voids that appeared during machining. The voids are small, about 1/16 inch diameter, but are definite cosmetic flaws.
What came to my attention is that all the voids are very close to the center of the bar. I believe that the voids form as the metals solidifies after casting, and that the center of the bar is the location of maximum material stress. So here is the solution for future reel feet: buy C954 with nominal 1/4 x 1-1/2 section and orient the blanks longitudinally rather than across. A 2.6 inch cutoff will then provide two reel feet (which finish at 0.525 wide) and a bit of waste from the center that has possible voids.
Common metals like brass C360 and aluminum 6061 are made into bar stock by extrusion; I have never encountered a void in an extrusion. A sensible person would probably be making reel feet from C360 instead of cast bronze.
For the front end ring and back end plate of my “bronze frame reel”, I use bronze alloy C544, which is made by extrusion and has no voids. It has a machineability index of 80. I would like to use it for the feet as well, but it is only made as round rod stock, so is a very inconvenient starting point for a foot. Alloy C932 would be much easier for a home shop machinist to source, and comes as round rod. But these rods are made by casting, and I would expect to see voids. Not a problem for front end rings, but fatal for making rear end plates.
I have not used the process, so the following text is his note:
“Powder coating has not been a hard process to master. In fact it is really pretty simple. The most important thing is to make sure the ground to the part being powder coated is really good. I have accomplished this by making a small stand with a round 1/4″ thick aluminum base and a 1/4″ diameter support up to the part being powder coated. I thread the back of the reel frame where the spindle connects to the reel frame and then thread the end of the 1/4” diameter support so it just screws into the back of the frame. I put the reel frame on the support with the top of the frame facing upward. Then I carefully turn the reel frame down so the top of the frame is setting on some wax paper and then spray the powder coat onto the back and sides of the reel frame. Then I turn it back over so that the top of the reel frame is pointing upward and then the spray the top and insides of the reel frame. Since the ground from the converter is -, and the + charge is located at the front of the powder gun, the positive charged powder particles are attracted to and stick to the negatively charged frame. You just have to make sure that you get plenty of powder on the part being coated and this is not too difficult since too much powder just will not stick to the frame. When this is finished, the reel frame is already mounted on a vertical support with a round base, so all you have to do it carefully pick up the mount and frame and place it into a preheated oven. I just use an inexpensive toaster oven that can reach the required 400 degrees F. You then bake the part at 400 degrees for about 25 to 30 minutes and then take the part out of the oven and let it cool. You can see the powder material flash heat and melt after about 5 to 10 minutes. When the powder melts it flows evenly out on the part in all directions.
“For the spool, I use the same stand, except I made a 0.500″ diameter aluminum plug that is about 1/2″ long and I just fit that plug tightly into the opening in the spool for the delrin bushing. the whole prcess is really easy to do and it is not that expensive to get started. You do not need a large compressor. The compressor only needs to provide less than 10 psi and a minimal amount of air flow. So most small pancake compressors will do the job. The powder gun and power source is only about $100.00. You can get everything you need from a company called Eastwood. They have about 100 different colors to chose from and most of the colors are less than $20.00 for a pound of powder.”
The last two images are of a new 2.5 inch reel.
Update 29 Jan 2022: Terry has provided fixture pictures and additional description.
“This is the fixture I use for powder coating the reel frame. I used the wire sticking out of the side of the column to powder coat the reel foot on my last reel, but I am trying to come up with a better fixture to do the reel foot. In this photo, both the base and the riser are made out of aluminum. I think that brass works a lot better for the column. In this photo, the top of the column is threaded with 8-32 threads, which is the same size threads I use to mount the reel spindle to the back of the reel frame. With this in mind, I also thread the back of the reel frame so that I can screw the reel frame onto the top of this column spindle. The negative connection for the powder coating equipment is clamped onto the lower part of the column spindle.
“Here I have screwed the top end of the spindle column into the back of the reel frame, and then turned the entire assembly upside down so that the back and sides of the frame are exposed. I always place this assembly on a piece of clean plastic so as not to contaminate the top edge of the front of the frame, which is now resting on the surface. At this point I apply the powder to the back and sides of the reel frame.
“Once the back and sides of the frame have been covered with powder, then I very carefully turn the assembly back over again so the front of the reel frame is facing upward. This then allows me to powder coat the front and insides of the reel frame.
“With painting complete, I very carefully disconnect the negative lead from the spindle and then place the entire assembly in my toaster oven with a pair of very long needle nose pliers. As long as you do not bump anything along the way, none of the powder coating will fall off of the reel frame.
“The oven has been preheated to 4000F. I usually allow the piece to stay in the oven (door closed) for about 25 minutes and keep the temperature in the oven as close to 4000 as possible. The powder will reach a “flash” point in about 5 to 10 minutes. You can see this occur because the powder actually melts and flows out evenly onto the frame. After 25 minutes I remove the part from the oven and let it cool before touching it. I do not like burned fingers. I use a laser temperature probe while the part is in the oven and then after it has been removed from the oven to monitor the temperature of the part. The air requirements for this process are pretty minimal and a small pancake style compressor is all that is needed. You do have to place a good particulate and moisture removal filter system in the airline to make sure there is not any moisture or small particles in the air that will show up in the final finish.
“This is a photo of the spindle column I use to powder coat the reel spools. It is screwed into the same base I use for the reel frame. I have made a slightly tapered plug that is screwed onto the top of this spindle. The tapered plug is sized to fit tightly into the center hole of the spool. The process for powder coating the spool is more-or-less the same as the one used for the frame, except I usually place a small spaced under the spool to keep the rear of the spool from the contacting the surface under it.”
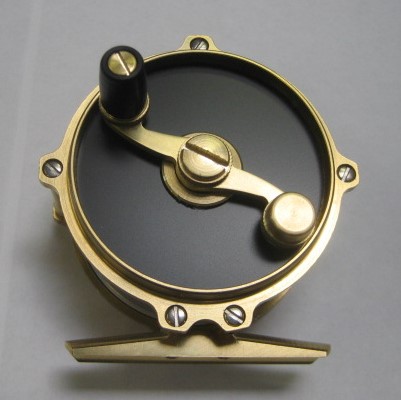
This reel, serial number 72, will probably be a one-off. I have given up trying to make batches of reels to sell.
It is 3 inches across pillars. Because it is mostly brass it is heavy, 7-1/8 ounce. Only the spool end plates are aluminum. It is sized for WF5F and a modest amount of backing.
The black side plates (plastic laminate) are decorative only. The reel is fully functional without them. The end plate webs are just .030 inch thick, but contribute to the weight.
Inside is my usual click mechanism, acetal ratchet and pawl. Both the pawl and spring pins are symmetric; a kink in the spring biases the click strength.
Yes, I do like the local Carne Adovada, but “Red Chile Water” is New Mexico’s designation for fly fishing only, catch and release streams.
The Covid epidemic kept me from fishing for more than a year, but this summer I have visited the Navajo Dam area of the San Juan River twice. It is a tailwater fishery and grows many large trout that feed on invertebrates washed from under the dam. It is also a state park. Water temperature is 42-46 degrees F year around, but I do not know whether natural reproduction takes place.
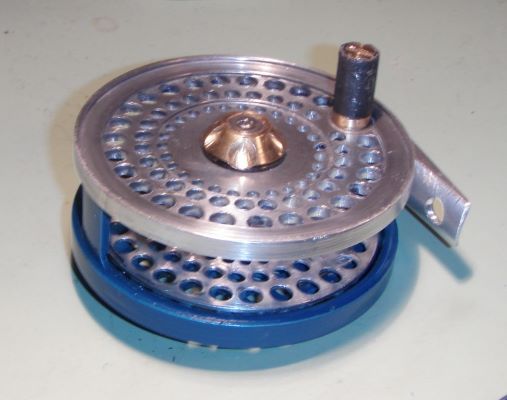
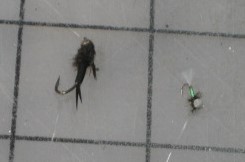
Guided fishing is very popular here because a guide can load his clients into a boat and easily control the situation. Fishing is done with a pair of small nymphs, split shot, and an indicator (known to bait fisherman as a bobber). I was on such a trip a couple years ago and can attest to the effectiveness of the method. Here on a 1 inch grid are a tandem set of flies left from that expedition. The beadhead is probably size 14 and is there mostly for weight. The smaller fly catches the fish.
A typical float trip starts at the Texas Hole boat ramp and goes downstream to the Crusher Hole ramp. The boats cannot go upstream from Texas Hole because they cannot navigate the shallow riffles in that direction. Here is a shot of one the riffles, looking down at a passage into the Hole.
Wanting to fish on my own rather than satisfy the need of a guide to prove himself, I have found that the riffles are full of 8 to 10 inch rainbows that will take swung wet flies of size 14. (The guides at the Hole and below will hook one up with 16+ inch fish.) Wading here is reasonably easy when water flow is 400 cfm or less. Also, there is a slow, silty area above the lowest set of riffles where fish surface feed in the late morning and dry fly fishing is effective. I have been very pleased with my two visits.
Francisco has an Orvis Odyssey IV reel, the largest of 4 Odyssey sizes and the one advertised as a “Big Game” model. The spring is stainless wire, but was fatigued and needed replacement. It is a simple shape and so an easy DIY task.
I sent him a bit of the finest wire that I had, .024 inch diameter. But it needed something finer yet.
He bought some finer sizes from McMaster (Spring Back Multipurpose 340 Stainless Steel Wire) and ended up installing .015 inch diameter.
How is it that I am typically using .029 wire for trout reel springs, and he needs much smaller wire for “Big Game”? The answer is of course geometry. I have a greater distance between wire support points and a quite different contact with the pawl.
Jim is a rod builder/repairer in Australia who recently described his use of the ferrule shrinking tool.
“I bought one of your tools quite some time ago and have used it often over the years to fix old rods I’ve done up, or just heavily used later builds belonging to myself and friends. One bugbear I used to have was repositioning the tool over a longer female and producing the ridge you describe in one of your earlier articles (if the repositioning didn’t quite overlap where the ‘first pass ended). Worse still was doing a third pass over the ridge (big mistake) which produced a ridge inside the female which is very difficult to remove. More recently I’ve been using the tool slightly differently and that seems to have completely overcome those problems. First, I mark the maximum depth the male slide will reach inside the female and mark just short of that point (ie just beyond the moisture dam) on the outside of the female with a fine permanent marker. I then insert the female vertically into the tool from the bottom up and tighten the two tension screws evenly with the mark just showing beyond the lower edge of one of the bearings. I then wear a leather glove on my left hand to protect the side of my hand from friction, grip the shaft of the rod with a closed fist and turn the rod and tool sideways. I have found that spinning the tool quickly with my right index finger against the tension screws for leverage WHILE also applying sideways pressure with my gloved hand gripping the rod shaft, will gradually spin the tool the full length of the female – but ensuring I end just shy of the reinforcement ring. The result appears to apply even pressure over the whole length of the female, so overall the ferrule fit is more even. If several passes are required with slightly more tension each time, the mark is still there, so it is just a case of going over the process. By the way, I’ve never had to tighten the tensioning screws beyond finger tightness on any ferrule I’ve worked on to date. I also bought one of your lovely little reels and that is still going strong – the patina on the bronze is superb after several years.
“The only things I might add is that the ‘gloved method’ does feel a little awkward at times to get that sideways pressure, but it is worthwhile persisting. Also, subtle, even, incremental tightening is important to ensure each pass moves up the female without binding in one spot. I did one for an acquaintance a year or so ago where I got distracted with too much fishing talk and either overtightened, or tightened unevenly and the tool got hung up straight away, which was bad news! However, that is the only fail so far using this method.”