
Terry continues to powder coat his reels.

I have not used the process, so the following text is his note:
“Powder coating has not been a hard process to master. In fact it is really pretty simple. The most important thing is to make sure the ground to the part being powder coated is really good. I have accomplished this by making a small stand with a round 1/4″ thick aluminum base and a 1/4″ diameter support up to the part being powder coated. I thread the back of the reel frame where the spindle connects to the reel frame and then thread the end of the 1/4” diameter support so it just screws into the back of the frame. I put the reel frame on the support with the top of the frame facing upward. Then I carefully turn the reel frame down so the top of the frame is setting on some wax paper and then spray the powder coat onto the back and sides of the reel frame. Then I turn it back over so that the top of the reel frame is pointing upward and then the spray the top and insides of the reel frame. Since the ground from the converter is -, and the + charge is located at the front of the powder gun, the positive charged powder particles are attracted to and stick to the negatively charged frame. You just have to make sure that you get plenty of powder on the part being coated and this is not too difficult since too much powder just will not stick to the frame. When this is finished, the reel frame is already mounted on a vertical support with a round base, so all you have to do it carefully pick up the mount and frame and place it into a preheated oven. I just use an inexpensive toaster oven that can reach the required 400 degrees F. You then bake the part at 400 degrees for about 25 to 30 minutes and then take the part out of the oven and let it cool. You can see the powder material flash heat and melt after about 5 to 10 minutes. When the powder melts it flows evenly out on the part in all directions.
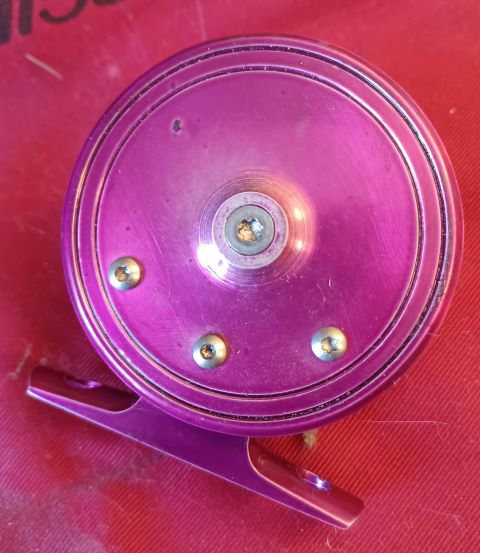
“For the spool, I use the same stand, except I made a 0.500″ diameter aluminum plug that is about 1/2″ long and I just fit that plug tightly into the opening in the spool for the delrin bushing. the whole prcess is really easy to do and it is not that expensive to get started. You do not need a large compressor. The compressor only needs to provide less than 10 psi and a minimal amount of air flow. So most small pancake compressors will do the job. The powder gun and power source is only about $100.00. You can get everything you need from a company called Eastwood. They have about 100 different colors to chose from and most of the colors are less than $20.00 for a pound of powder.”
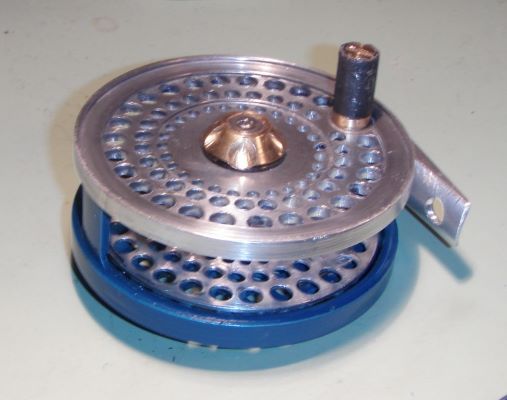
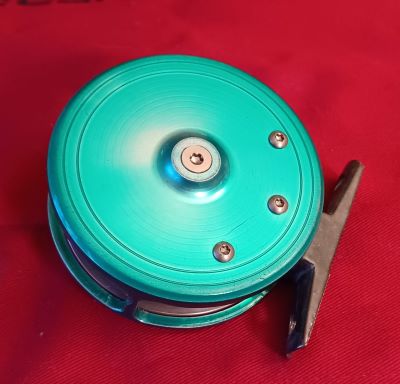


The last two images are of a new 2.5 inch reel.

Update 29 Jan 2022: Terry has provided fixture pictures and additional description.

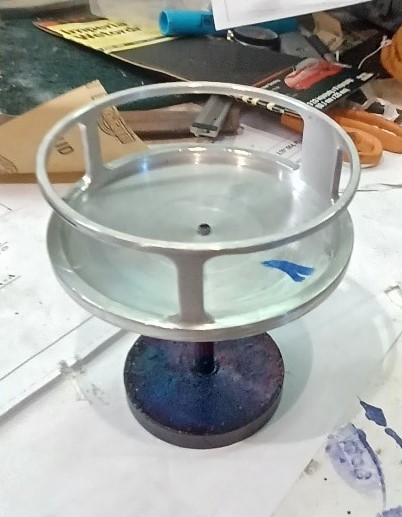
“This is the fixture I use for powder coating the reel frame. I used the wire sticking out of the side of the column to powder coat the reel foot on my last reel, but I am trying to come up with a better fixture to do the reel foot. In this photo, both the base and the riser are made out of aluminum. I think that brass works a lot better for the column. In this photo, the top of the column is threaded with 8-32 threads, which is the same size threads I use to mount the reel spindle to the back of the reel frame. With this in mind, I also thread the back of the reel frame so that I can screw the reel frame onto the top of this column spindle. The negative connection for the powder coating equipment is clamped onto the lower part of the column spindle.

“Here I have screwed the top end of the spindle column into the back of the reel frame, and then turned the entire assembly upside down so that the back and sides of the frame are exposed. I always place this assembly on a piece of clean plastic so as not to contaminate the top edge of the front of the frame, which is now resting on the surface. At this point I apply the powder to the back and sides of the reel frame.
“Once the back and sides of the frame have been covered with powder, then I very carefully turn the assembly back over again so the front of the reel frame is facing upward. This then allows me to powder coat the front and insides of the reel frame.
“With painting complete, I very carefully disconnect the negative lead from the spindle and then place the entire assembly in my toaster oven with a pair of very long needle nose pliers. As long as you do not bump anything along the way, none of the powder coating will fall off of the reel frame.
“The oven has been preheated to 4000F. I usually allow the piece to stay in the oven (door closed) for about 25 minutes and keep the temperature in the oven as close to 4000 as possible. The powder will reach a “flash” point in about 5 to 10 minutes. You can see this occur because the powder actually melts and flows out evenly onto the frame. After 25 minutes I remove the part from the oven and let it cool before touching it. I do not like burned fingers. I use a laser temperature probe while the part is in the oven and then after it has been removed from the oven to monitor the temperature of the part. The air requirements for this process are pretty minimal and a small pancake style compressor is all that is needed. You do have to place a good particulate and moisture removal filter system in the airline to make sure there is not any moisture or small particles in the air that will show up in the final finish.

“This is a photo of the spindle column I use to powder coat the reel spools. It is screwed into the same base I use for the reel frame. I have made a slightly tapered plug that is screwed onto the top of this spindle. The tapered plug is sized to fit tightly into the center hole of the spool. The process for powder coating the spool is more-or-less the same as the one used for the frame, except I usually place a small spaced under the spool to keep the rear of the spool from the contacting the surface under it.”

Looks great! I especially like the aqua color; has a classy look. Maybe Terry could add a pic or two of his setup. I can kinda picture it based on his description, but a picture or two is worth a thousand words.
Yes, pictures would help. Observe that the post is now updated.