
I like to use bronze for reel spool shafts. Portions of the shaft are the bearing journals, and it seems right to have bronze there, instead of aluminum. But bronze is heavy; the shaft of my first reel design was 1.15 oz, and that is a large part of the total reel weight of 5.4 oz.
A hollow shaft would save a lot of weight. Material at the center is contributing very little to shaft strength or stiffness. So I have made a shaft of 3 sections in order to be hollow at the center.

These 3 parts are to be joined by silver brazing. This shaft is for next reel`design, and it would be 1.20 oz if solid, but only 0.62 oz when hollowed.
For brazing, I bought 1 oz of STL-1205-655 from SRA Soldering Products. This melts at 1205 F. I put some chamfers on the 3 shaft parts to allow a little room for the solder.
Someone experienced with using a torch would probably have no problem brazing this. While I have done a lot of low temperature soldering (plumbing, electronics), I was not confident that I would know what to do with the torch. Fortunately, I had already bought a kiln so that I could harden steel. This is also a suitable heat source for brazing. SRA recommended 1350 F kiln temperature for brazing with STL-1205-655. They also advised to preheat the kiln before inserting the part.
The paste is simple to use. It is a mixture of flux and metals and comes in a syringe. Just apply it to the parts, assemble, and heat.
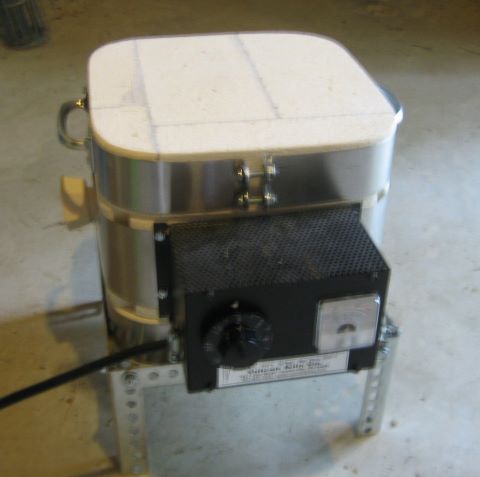
This is a model JK-1 from Vulcan Kiln Co. It has a manual heat control and a thermocouple with indicating meter.
Here is a grate that I made from stainless steel to support parts in the kiln.

This was the first time that I used the kiln, so I kept a record of time and temperature for the operation. The heat control knob is marked OFF-1-2-3-4-5-6-HI. I think that it is a bimetallic control of the type used on electric ranges; it duty cycled the heater as a range control would.
time temp (F) remark
3:04 70 set control to 2; kiln is closed and contains only the grate
3:14 500 set control to 4
3:24 900 set control to 5
3:34 1300 set control to 5.5
3:35 1350 set control to 5
3:37 1400 set control to 4.5
3:39 1400 put shaft onto grate (now glowing red)
3:40 1400 set control to 4
3:41 1425 set control to 3
3:43 1350
3:45 1350 shaft glowing red
3:46 1350 turn off, remove shaft, re-close kiln
3:49 1100 cooling w/ cover on
3:55 950
4:21 650
5:08 400
The cool-down rate is of interest because it shows that unpowered cool-down is too rapid for annealing many steels. To anneal, you would have to gradually reduce the control setting, and this might take hours. 416 stainless has to be cooled no faster than 50 F/hour until it is down to 1100 F.
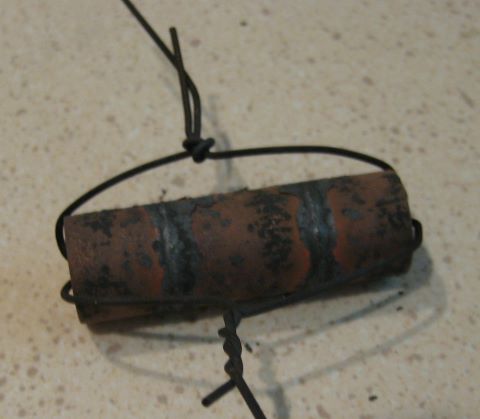
Here is the shaft after brazing, covered with scale.
And here it is cleaned with sandpaper.

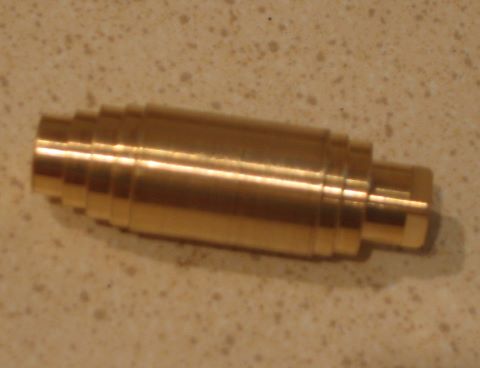
Finally, here is the machined shaft.
Update 6 Feb 2012: I have made 9 hollow shafts by brazing, but have had 2 failures. The failures show up during machining. Turning the several diameters imposes a rapidly reversing stress on the braze joint that exceeds anything that will be seen in service. The failure is due to insufficient braze metal in the pocket where the two pieces meet, and this pocket is hidden (up until the failure). I have now made a shaft and bonded the joint with Loctite 609. It machined with no problem. Refer to my post of 27 Aug 2010 for adhesive bonding. To make this bronze-bronze joint, I did not bother with activator.
