
This post is about an experiment with an unsatisfactory result. But we learn from failures, perhaps more than from successes.
I am interested in making spool ends for reels by metal spinning. The goal is to make a spun spool end from nickel silver so it can be brazed to the shaft, but my experiment was with aluminum which is supposedly easier to spin.
There is a good on-line article on making a spinning lathe, but since my goal seemed modest (just a small amount of forming) I tried to get by on the cheap by spinning on my Sherline lathe. The conclusion is that even for this simple task the Sherline is not sufficiently rigid or powerful.
My information source was a book from Artisan Ideas, which turned out to be a technical school textbook from 1936. I recommend the book as a record of a disappearing art. It shows what should have been a warning to me: the spinning tools are often 2 or 3 feet long, to get the leverage needed.
Here are the tools that I made (or bought) for my lathe:
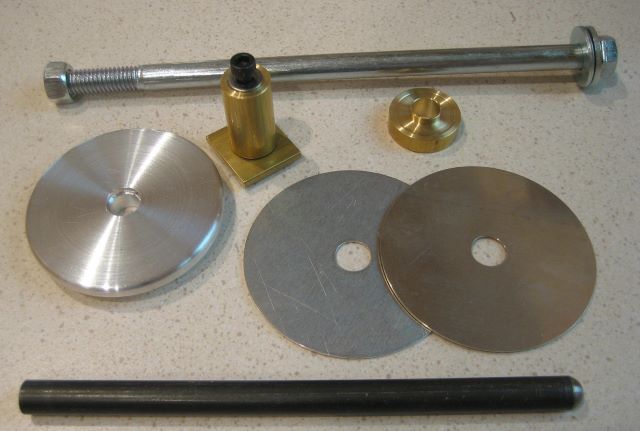
From the top: clamping bolt, brass fulcrum, brass clamping washer/pilot, aluminum form or “chuck”, aluminum and nickel disks to be spun, steel tool with hemispherical end. The forming that I wanted was to turn the edge of the disk 90 degrees.
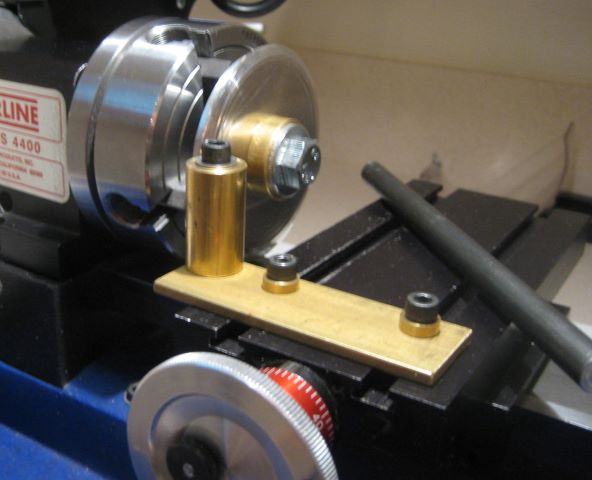
This is the setup. The cardboard box is to be moved forward to serve as a shield from the expected spray of warm lubricant (beeswax) which, in the event, did not happen.

Here is a modification of the setup to move the fulcrum to better position.
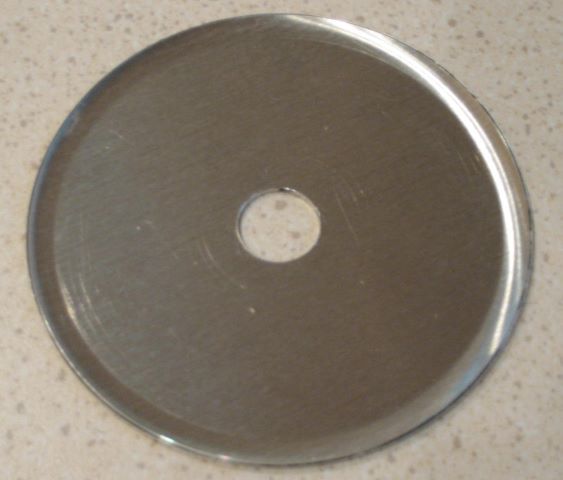
Forming the spinning disk takes a larger force than I could apply, given the compliance of the lathe and the length of the tool. I could not turn the edge 90 degrees.
Here are the front and back sides of the partly formed disk.

There was no point in trying the nickel silver disk (.032 thick) since I failed with the aluminum (.040 thick). So I will continue to use machined spool ends.
Update 18 July, 2011
Instructional Materials
Richard Westerfield read my original post on metal spinning and offered to loan some instructional materials. One was a set of DVDs by Terry Tynan.
The other was a CD-rom by James Riser.
I recommend both. Tynan is an expert spinner and shows the techniques to spin many shapes. Riser seems to be more of a DIY amateur who figures out how to get things done. Tynan may forget to mention what he uses for lubricant; Riser will give you a dozen alternatives. Tynan makes his tools by grinding pre-hardened rods; Riser does it by forging.
How would I use this information? Tynan’s 3rd DVD concerns projects done where the lathe is a converted wood lathe. The one he uses looks as if it would handle a 10 or 12 inch diameter wood workpiece. There are just two steps to the conversion: 1) add a C or Bar clamp to the bed to keep the tailstock and toolrest holder from creeping, 2) make a spinner’s toolrest.
I wish that I had taken to trouble to seek out this material before starting my spinning effort; I probably would not have wasted my time. The CD and DVDs are very good and I recommend them to anyone who is serious about spinning. But I need just one spun part, a spool end, and I can machine that.

have you ever thought of deep drawing these parts,i have been doing reel seat parts and ferrules this way and think it would work quite well,thanks,steve
Steve,
I just saw your reel seat hardware on Clark’s forum, and it is beautiful work.
Yes, I am aware of the deep drawing process, but I lack critical information:
1. How to design suitable dies (clearances, hardness, etc)
2. Size of press (tons), given the die and part design.
Please point out any useful reference material.
Dave
dave i have made dies out of drill bushings, inside races of ball bearings anything that is hard and has a good ID,i have even made some temporarie dies out of cold rolled that worked,why dont you give me a part,i mean the dimensions, you want to make and let me see what i can figure out,it seems to me that rims and spool ends should be a 1 draw deal,and then trim to length or dimension on the lathe,i have never made a reel but have often thought that deep drawing could be usfull,give it some thought and let me know what you think,steve
Steve,
The blog host WordPress has provided me with a comcast.net Email address for you, so I will send you a drawing later today.
Dave
Greetings,
Out of curiosity, did you take note of what type of aluminium alloy and heat treatment state you used? At work we experimented with cold forming of thin walled tubes (<2mm) but we annealed them first. When soft, we could dent them by squeezing the tube in the hand, so I suppose spinning an annealed disk and then hardening it could be easier (as long as a you have somewhere to do the heat teatments).
Horacio,
It was 6061-T6. I did not try to change the material condition before spinning.
Dave
Hi Dave,
6061 is a reasonably hard alloy but it is heat treatable. In case you ever want to revisit the subject, the annealing procedure is as follows: heat the part to ~430ºC in a furnace, let it soak for about 20 mins (it’s a small part) and then allow it to cool at a rate slower than 28ºC per hour until ~250ºC (after this temperature, the rest of the way can be cooled more quickly). In our work we found out that if we just turn off the furnace and leave it closed overnight, the next morning the alloy would be soft without need for tight temperature control on the cooling stage. By “soft” I mean, about 1/3 of the original yield strength.
To harden it afterwards back to T6, heat up to ~530ºC (careful here in not exceeding this temperature by more than 15 to 20ºC) and leave to soak for about 45 min. Then, open the furnace and quickly quench the part in room temperature water, as evenly as possible to prevent warping. After this, let the furnace cool down to around ~160ºC and then leave the part in at this temperature for about 8 hours. In the end, if all went well, you should have reasonably the same mechanical properties of the original stock.
Cheers
Horacio,
This is valuable information for the reelmaker or home shop machinist. Can you site a technical reference book with this type of information?
Dave
Hi Dave,
The numbers I gave were from my own experience, which was based on two sources: the ASM Metals Handbook (vol. 4) and a little technical booklet in French published by Pechiney (an aluminium maker, now part of Rio Tinto Alcan) called “Demi-Produits en Aluminium”. This one is my favourite because it’s very straightforward but unfortunately getting a copy of it may prove difficult.
You can also find this information online from various sources such as http://www.azom.com/article.aspx?ArticleID=2540 or http://www.vjp.in/heat-treatment-process.html. You will notice that the specific numbers vary from source to source, as each one will give the exact “recipe” that worked for them.
If you have the patience (and/or the interest), you may also try to dig through military or NASA standards about the subject. These documents may be overly extensive a little maze-like, but they tell us how it’s done for the real high-end stuff. As an example, I found the MIL-H-6088 standard at everyspec.com, which covers aluminium heat treatments: http://everyspec.com/MIL-SPECS/MIL-SPECS-MIL-H/MIL-H-6088G_17472/
Hope it helps.
Cheers