
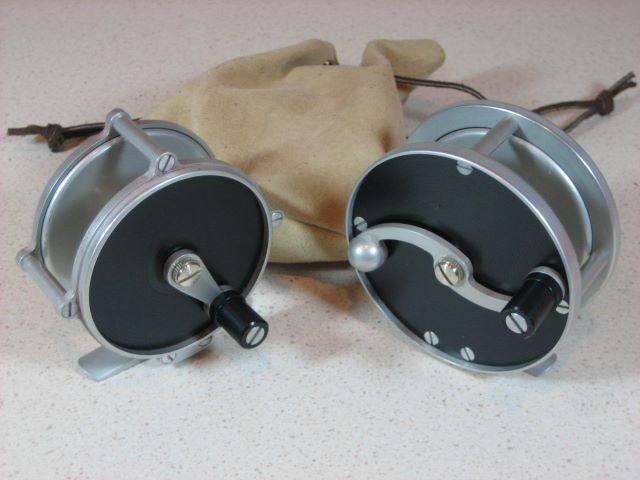
After making the reels shown here, I sat down and redrew my rather ragged looking set of plans. Then I contacted Michael Hackney to see if they would be something to show on his forum Reelsmithing. He was favorable. After a few Email rounds, we settled on making a publication out of the plans. So they can now be purchased at his commercial site, The Eclectic Angler. Just look for Kits, Materials & Books > Books and Plans. The title is “Round and Raised Pillar Reel Plans”.
Update 27 Nov 2014: I see that Michael has moved the plan sales from The Eclectic Angler to Reel Lines Press.
So that you can see what is available, I have put the contents in this post, but at lower resolution than you would get with the booklet at The Eclectic Angler. Here it is:
Construction Notes for Reels 11 and 15
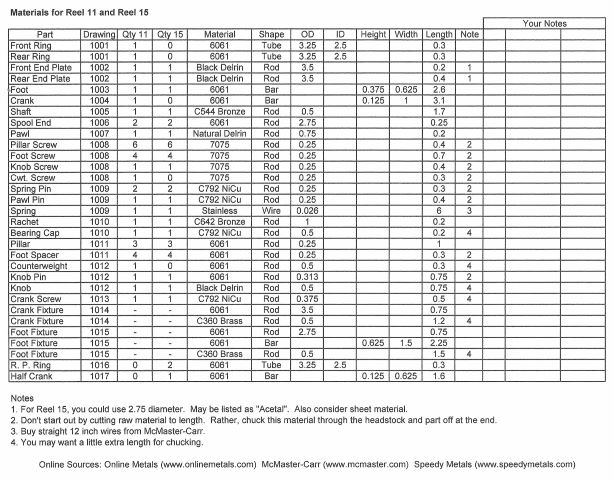
These notes supplement drawings 1000 through 1018.
Two relevant web references are:
A. My blog, http://northbranch reels.wordpress.com. Here you will find much supplementary information.
1. Anodizing (May 4, 2010)
2. Gear Cutting (May 10, 2010)
3. Testing Pawl and Ratchet (May 30, 2010)
4. Overview at Grayrock (June 24, 2010)
5. more on Pawl Wear (Aug. 22, 2010)
6. Loctite Spool Assembly (Aug. 27, 2010)
7. Embarrassing Retraction (Sept. 6, 2010)
8. Milling the Foot (Sept. 28, 2010)
9. Milling the Crank (Oct. 4, 2010)
10. Turning the Counterweight (Oct. 15, 2010)
11. End Plates (Oct. 23, 2010)
12. Spool Ends (Oct. 31, 2010)
13. End Rings (Nov. 7, 2010)
14. more on Pawl Wear (Nov. 16, 2010)
15. Screws (Dec. 14, 2010)
16. Parting (Dec. 19, 2010)
17. Dry Fit (Jan. 13, 2011)
18. Raised Pillar Frame (Feb. 3, 2011)
19. Metal Finishing (Mar. 3, 2011)
20. Anodizing Problem (Mar. 6, 2011)
21. Glamour Pictures (Mar. 22, 2010)
After March 2011, posts start to get into issues with a new design.
B. An article in Power Fibers on-line magazine for April 2011, “Small Machine Tools for Reel Fabrication”. This article shows the tools that I use. Please read first, as it is highly relevant to what follows here. I reprinted it in my blog on May 6, 2011.
Disclaimers:
1. I am not promoting Sherline Tools. Sherline just happens to be what I own, and the only machine tools I have used. I am not knowledgeable of the alternatives.
2. The designs here are not reproductions of classic reels. I don’t collect classic reels so I don’t have extensive background on how they were built. I just designed this reel to have a similar general appearance.
3. Because I am a self-taught machinist, I may not know the best way to do everything. But I have a workable method to make the parts for this reel design. I may unknowingly employ some difficult means to do some simple task. If you spot a glaring absurdity, please tell me. Post a comment to the blog.
Why “Reel 11” and “Reel 15”?
I decided to put serial numbers on my reels, and did not want to start with S/N 1. Some potential buyer might think I had never made a reel before (and he would be nearly right). After making a prototype, I decided to tackle a group of 5 reels, and numbered these 11 through 15. So the original prototype became reel 10. Close to the end of machining, I changed reel 15 to a raised pillar design, using most of the same parts as 11-14.
Isn’t it difficult to do this work with such small tools?
It is slow rather than difficult. When your lathe and mill are lightweight and compliant, you are restricted to light cuts on relatively soft materials. So it is not a good economic proposition. I do not recommend Hardy style designs with one piece frame and spool; too much material to remove.
Should I try this if I am a right brain person?
It does involve the ability to concentrate for a long period of time. Basic trigonometry is needed. You might deduce that I am left brained.
What is the advantage of this design?
It has been built five times, as of this writing. So the parts do fit together. Tooling investment is minimal, for a machine shop. Materials have been chosen with consideration for ease of machining. And there are not many other reel plans available for the home shop machinist.
Why don’t the dimensions on these drawings show any tolerances?
I do know something about setting tolerances for the parts of an assembly, but I consider it unnecessary for a “one off” item where one craftsman makes all the parts. He is going to make them fit together. A given part doesn’t have to fit every possible realization of its mating parts. Four of five reels went together for me as first machined, and one needed a washer shim on the shaft.
Notes on the Individual Drawings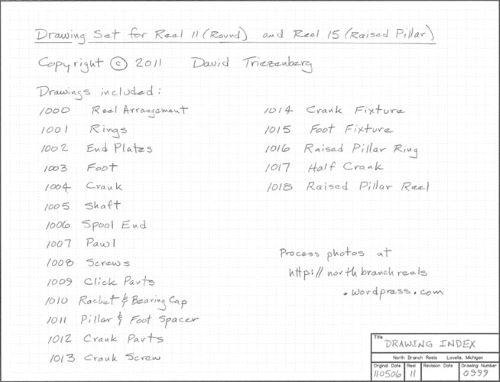
0999, Drawing Index
Drawings 1000 through 1013 show the parts needed for Reel 11, a reel with round side plates and an S shaped crank. 1014 and 1015 are fixtures used to make two of the more difficult parts. 1016, 1017, and 1018 show alternate parts/modifications that turn the round reel into a raised pillar reel (Reel 15).
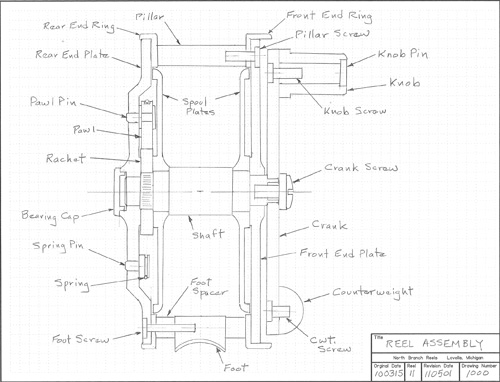
1000 Reel Assembly
This just shows how all the parts go together. The pawl pin, spring pins, and bearing cap press into the Delrin rear end plate with an interference fit. You will need an arbor press or a bench vise, along with suitable “push tools” (pads, anvils), to put these in place. The spool ends go onto the shaft with Loctite; I went to some effort here to avoid contact of bare metals with different electrochemical potentials. The ratchet pushes onto a portion of the shaft that has been raised by knurling. I find it too difficult to make an interference fit between plain diameters on metals.
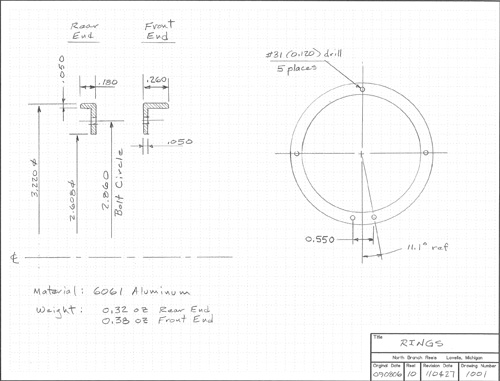
1001 Rings
I made these from heavy wall tubing of 3.25 OD, 2.50 ID. Speedy Metals has it. Buy 1 inch cut-offs, which are easy to hold in a 4 jaw chuck while hacksawing narrow rings. See my chuck holding fixture in the Power Fibers article.
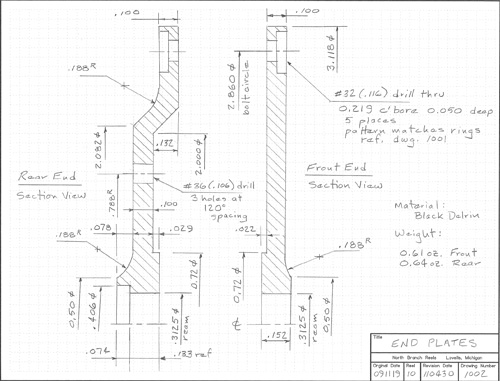
1002 End Plates
I made these from cut-offs of a 3.5 inch diameter Delrin rod (On Line Metals). But I now think that sheet material would be better starting point. Grip a square of the sheet in the 4 jaw chuck, partly round off the corners with a mill (to gain clearance when you move to the lathe), rough out the rear end plate cavity on the mill, then finish on the lathe. Take care to get the OD and 5/16 bore as concentric as possible. You probably cannot do both with the same chucking, so use your “Last Word” indicator to get centered again when re-chucking.
It is difficult to get a good finish on Delrin. I ended up making a special tool post that holds a 3/8″ diameter carbide cutter with “chip breaker” edge, and then feeding very slowly, using a hand-over-hand (finger-over-finger?) technique on the cross-slide wheel to help maintain constant rotation velocity of the lead screw. That’s why you see 0.188 inside radii in corners of the outward facing surfaces.
In his May 2011 newsletter, Michael Hackney (The Eclectic Angler) explains how to flame polish Delrin. His explanation has the Ring of Truth and probably works, but I have not tried it.

1003 Foot
This is a straightforward mill part except for the curved surfaces. For the bottom, I made a series of passes with a 3/8″ ball end mill, then sanded against a round dowel. The top required a special fixture (drawing 1015). You might make the top surface a cone instead of a cylinder by turning the foot while it is clamped to a mandrel. But it would be an interrupted cut, and that sounds problematical. I used 3/8 x 5/8 bar stock.
Note (29 May2011): Drawing 1003 lacks an important dimension, the overall length of the foot. It is supposed to be 2.50 inches, in accordance with the AFFTA reel foot standard.
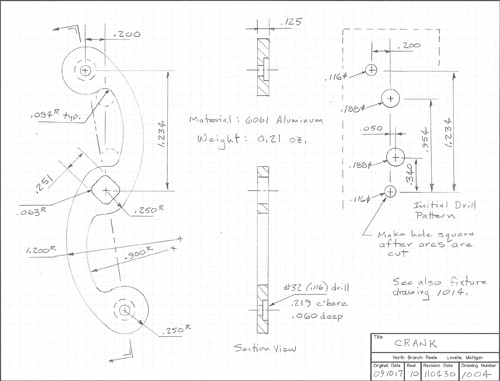
1004 Crank
Here, several circular arcs must meet up on common tangents. It takes some geometry to work this out, but the final solution is the fixture in Drawing 1014. It has enough holes to hold the workpiece in position for the 0.250, 0.900, and 1.200 inch radius arcs. The trick is to first drill 3 holes (0.116) and plunge mill 4 holes (0.188) in 1/8 x 1 bar stock. Then there are points to fasten down the part and good visual references for starting and stopping each arc. The 0.251 square hole is not made until all outside edges are milled. Until that point, it is just an 0.116 drilled hole, which closely fits a 4-40 clamping screw. I put spacer washers between the part and the fixture while milling so I don’t have to cut into the fixture.
When milling the several arcs, I cut them oversize 0.010 in two passes of 0.063 depth each. Then I come back and take off the last 0.010 in a single full depth pass. That way, I can get a smooth finish. My 3/16 milling cutter has 2 flutes.
When making the 0.251 “square ” hole, I first cut it undersize with a 1/8” end mill. Then I take a square section file and hand work it to a close fit to the shaft (which I made first).

1005 Shaft
This is a straightforward lathe part. I tried to turn it between centers but did not have clearance for my lathe tools. So I held it with a 4 jaw chuck and did one end at a time. I think I got less than 0.001 runout between journals by careful alignment with a “Last Word” indicator.
I used C544 bronze. This material machines freely, is more corrosion resistant than brass, and forms well (for knurling). I could have saved weight with aluminum, but somehow I cannot think of aluminum as a material for shaft journals.
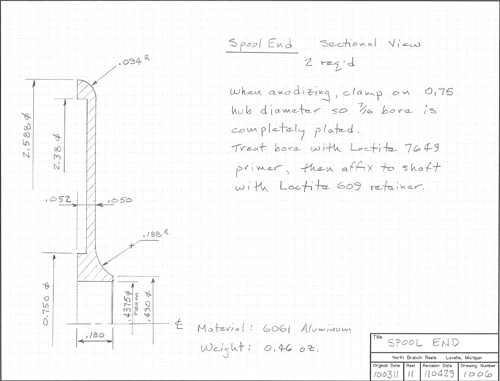
1006 Spool Ends
I used 2.75 inch diameter rod cut-offs. I made the back side recess with the mill, then switched to the lathe. I chucked on the back side 0.75 diameter while making the OD and the 7/16 bore, in order to get best concentricity. Used my 3/8 diameter carbide insert for the 0.188 radius, which is tricky because there is a big squeal if I try to take too wide a chip. I approach the final position of the cutter in steps, first from one direction and then from another.
For the 0.094 radius, I cut a 45 degree corner off and then finished with a file. Sherline sells a compound slide for making angle cuts on the lathe, but I don’t find it very useful because it doesn’t seem to hold a HSS lathe tool at the proper angle. Instead, I rotate the headstock to a 45 degree angle.
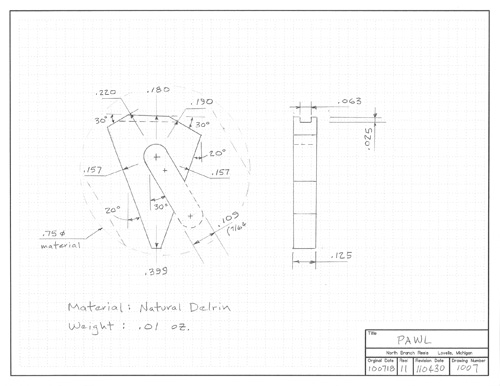
1007 Pawl
You will find that a metal pawl is too loud. Delrin appears to be durable; see my posts in the blog. The shape is an irregular hexagon. I have made it from cut-offs of an 0.75 or 1.00 inch diameter rod. Face the material to 0.125 thickness, make flats on opposite sides and grip in a vise with rabbeted jaws (see the Power Fibers article). Now mill the 7/64 groove, which closely fits a 4-40 screw. Then fasten to the top of a post that has been carefully centered in the 4 jaw chuck, which is in turn on the rotary table. The six sides of the hexagon are all dimensioned from the center of rotation, which is exactly what you need to mill the outline in 6 quick passes.
Another reasonable starting point is 1/8 inch sheet material.
To help retain the spring, a groove is cut on the back.
The two sides cut at 0.190 and 0.220 radius determine the difference between winding in and paying out drag. The pawl can be flipped to change from RHW to LHW.
Update 20 May 2013: Engineering student Keenan has modeled all these parts with Solidworks, and on this drawing he discovered an error. The distance to the long flat should be 0.147 rather than 0.157 inch. Hats off to Keenan.
Even with the wrong dimension, the reel reverses direction with no jam, as the pawl rides its pin on a slot.
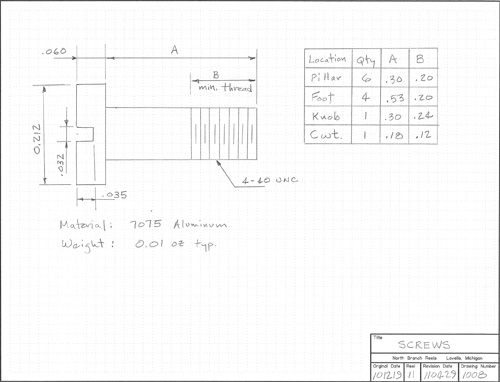
1008 Screws
Maybe I am too cautious about electrochemical corrosion, but I didn’t want to put stainless steel screws into an aluminum frame. So I made the several screws. Used a round threading die, for which Sherline sells a die holder to fit the Morse 0 taper in the lathe tailstock. Many details are in one of my blog posts.
A benefit of making your own screws is that you get exactly the length that you would like to have.
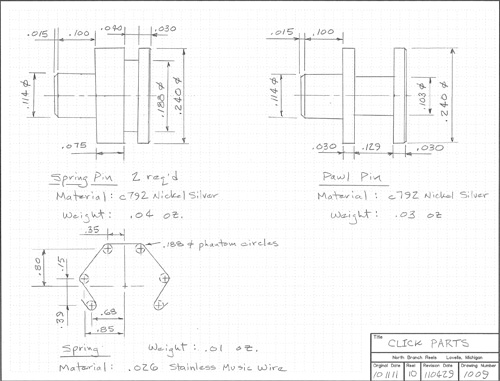
1009 Click Parts
Two spring pins have an 0.040 wide groove made with the Sherline parting tool. The 0.129 groove in the pawl post was also made with this tool by combining several cuts.
The spring wire is bent using round jawed wire pliers. Here is one task where a full size layout of the part is handy.

1010 Ratchet and Bearing Cap
The ratchet is C642 bronze, which is relatively hard but still machineable. Actually, all bronzes have a range of hardness that depends on the amount of work hardening. I was reminded of this while facing off blanks for the ratchet, when a carbide tool that had been cutting suddenly started skating across the face.
I cut the teeth with a 36 DP, 20 degree pressure angle involute gear cutter. I bought this as a clearance item from Wholesale Tool (http://wttool.com/), not realizing that it was rare. It now appears to me that involute cutters based on the DP system are normally 14.5 degree, while those on the module system are normally 20 degree. So you may not be able to find the same cutter that I used.
I think that there will be no problem cutting these teeth with a 14.5 degree cutter, even though I designed the pawl to look like a rack tooth of 20 degree pressure angle. The pawl tip goes down between two ratchet teeth only momentarily when the spool is reversing direction. Most of the time it is bouncing against the sharp corners at the tips of the ratchet teeth. When the spool does reverse direction, this pawl can ride upwards, away from mesh, because of its slot.
To reduce pawl contact stress, it would be a good idea to slightly round the corners of the ratchet teeth with a file.
While cutting ratchet teeth, I hold the cutter on a homemade brass arbor. The photo of this was mistakenly left out of the article in Power Fibers, but I restored it when publishing the same article in my blog.
Involute cutters are made in sets of 8, each covering a different range of tooth number. No need to get the one for 30 teeth. One meant for fewer teeth will be fine; it will round the teeth more. We aren’t really making gears, after all.
The bearing cap is a decorative part. I had a jeweler engrave its polished face with the serial number.
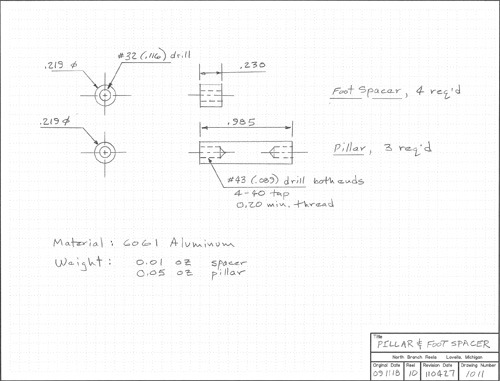
1011 Pillar & Foot Spacer
Not much to say here.
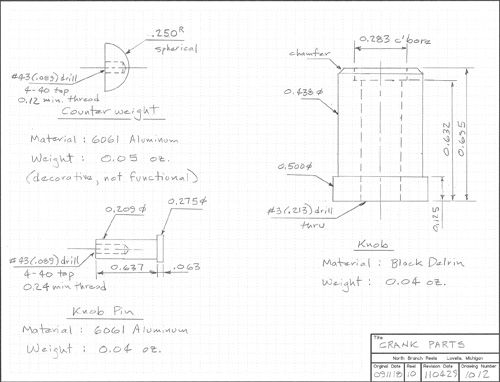
1012 Crank Parts
The decorative counterweight has a spherical surface, produced by mounting a lathe tool post on the mill’s rotary table. A photo that tells the story is among my blog entries. The knob and its pin are straightforward lathe parts.
When I originally designed these parts, I thought that the pin and counterweight would be brass. Had they remained brass, the counterweight would balance the knob and pin. In aluminum, there is no longer balance, but it is not something that I notice while fishing. A larger counterweight would restore exact balance.
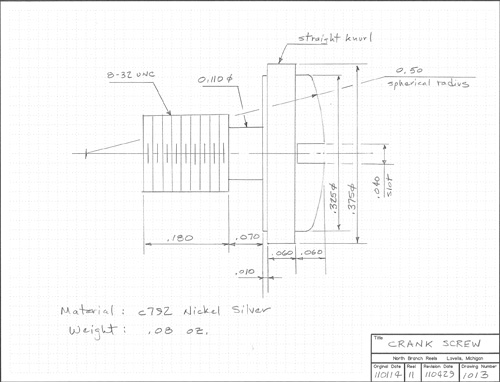
1013 Crank Screw
This is another conventional lathe part, except for the spherical shape of the head, which was produced in the same manner as was the counterweight.
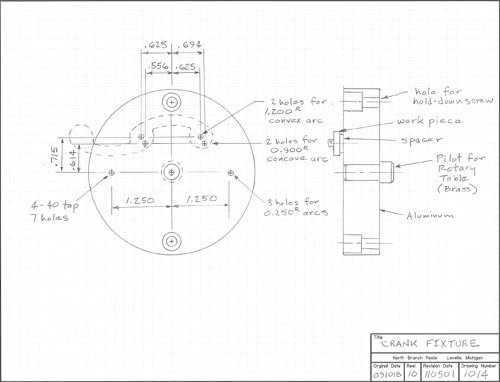
1014 Crank Fixture
Sometimes making the fixture is more challenging than making the parts. See if you can solve the geometry problem of locating the screw-down holes.
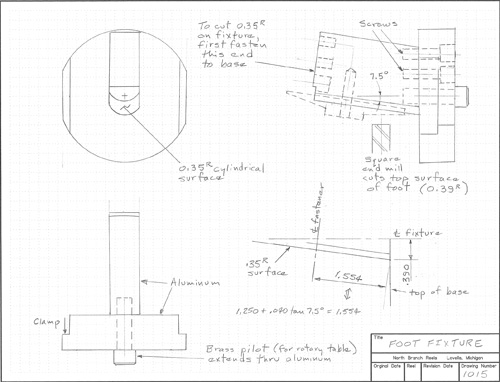
1015 Foot Fixture
This fixture holds the foot at a 7.5 degree angle while the convex top of the foot is milled. One problem in making this is to cut the 0.35 inch radius cylindrical surface that the foot will sit on. The solution is to bolt the upright part upon the base by its other end, then mill that cylinder as you would mill that on the foot itself.
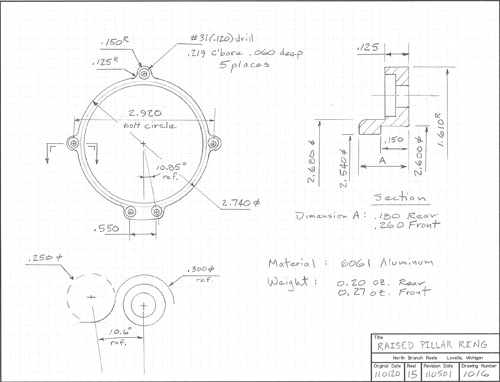
1016 Raised Pillar Ring
This design can be made from the same hollow tube used for the round rings, but it is tight fit. Raw material should be centered when first chucked. I have already devoted one blog post to making this part. A new design under consideration is very similar, and may generate another post. As for the S shaped crank, take the last 0.010 off the edges with a single full depth pass of the mill.
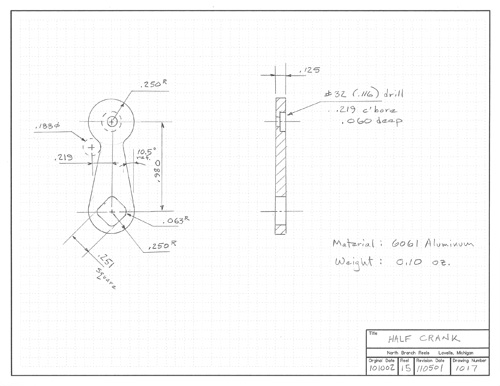
1017 Half Crank
After the S-Crank, this one is easy. Again, cut the “square” hole after the outside is profiled.

1018 Raised Pillar Reel
End plates smaller than those of the round reel are pressed into the rings. Make a suitable “push tools” for your press or vise from disks of wood.
A word on finishing the parts
One blog entry is on the use of a vibratory finisher. This is not money well spent when you are making reels one at a time. Instead, get several grades of wet/dry sandpaper. A good way to use this is to super glue little patches onto popsicle or tongue depressor sticks, then apply a little lightweight oil while sanding.
Machining with Coolants
A desktop lathe or mill doesn’t have the horsepower needed to heat up the parts. I do not use coolants or lubricants while cutting, except for a drop of light oil when drilling and tapping.


Pingback: Lathes - Fly Fishing Forums
Pingback: Not Rod but Reel - Fly Fishing Forums
I notice that you seem to be using a small bow compass for your drawings. A drop compass has a stationary pivot and a pen or lead carrier which revolves around it eliminating the twist of the bow compass and also eliminating the frustration getting the circles concentric.
I just bought your plans and enjoy this blog very much.
ellis
Michael,
For circles under one inch, and a few over, I am typically using a circle template. I do have some problem getting the template centered.
Thank you for pointing out the drop bow compass; this was new to me, and I thought that I was well versed in drafting tools. Now I have to get one and try it out.
Dave
Would it be possible to alter these plans to machine a larger capacity spey reel?
Certainly. For guidance on spool size, you should look at the post of 19 Feb 2012, “Spool Capacity Data”.
I would also recommend changing the pawl arrangement to that of my more recent reels, wherein the spring is a straight wire that fits in a slot in the pawl. With this design, you could have 2 or 3 pawls working the same gear.
Dave