One Piece Spool

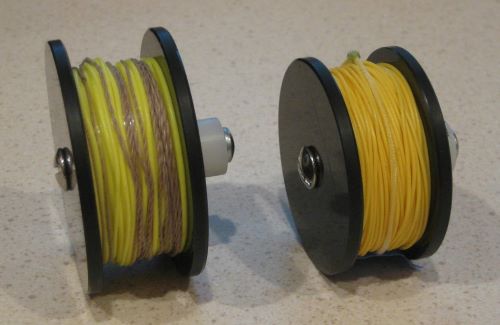
For some time, I have been plotting how to make a one piece spool. My spools so far have been assemblies. The difficulty is the limited power and size of my Sherline lathe and mill. Recently I am developing a design for a very small reel, and this seemed like a good place try the first one piece spool. Here is my procedure.


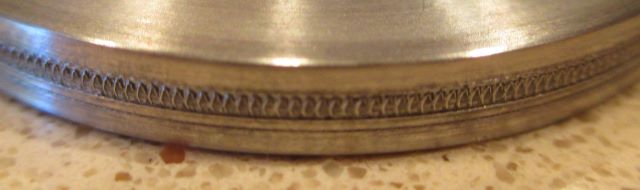
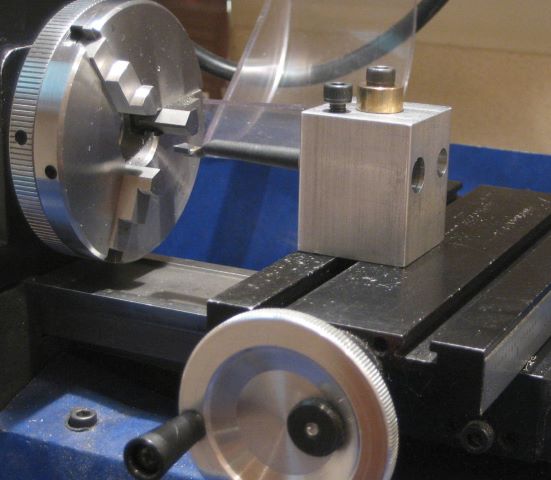
Starting with a section of round rod, face both ends. Drill and bore a through hole so that the material can be clamped to a faceplate (on the lathe) or to the rotary table (mill). Cut the OD at both ends and add any recess details.


With the work clamped to the rotary table and the table in a vertical position, remove as much material as possible with a roughing end mill.


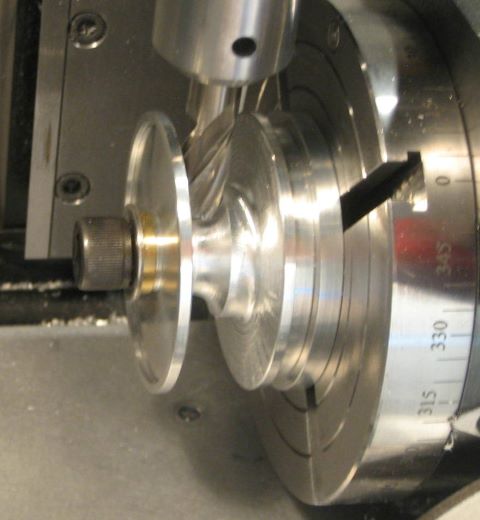
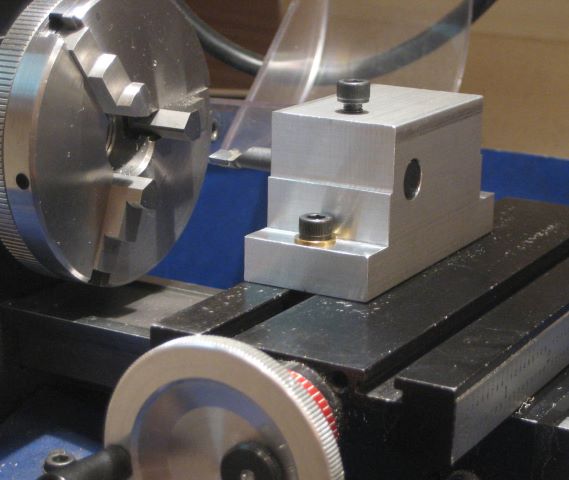
Switch to a ball end mill and continue removing material from the center. Leave some material for finish turning.


When using a square end mill, offset the spindle from the rotary table axis. A ball end mill can be run on center.


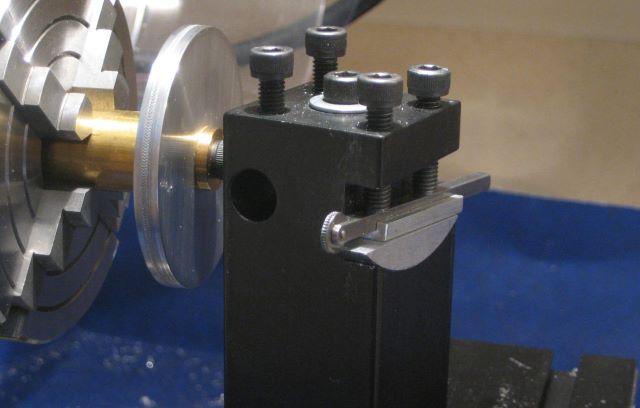
Finish turn the flat areas of the ends with a carbide insert tool. I can find no way to get an HSS cutter into this space.


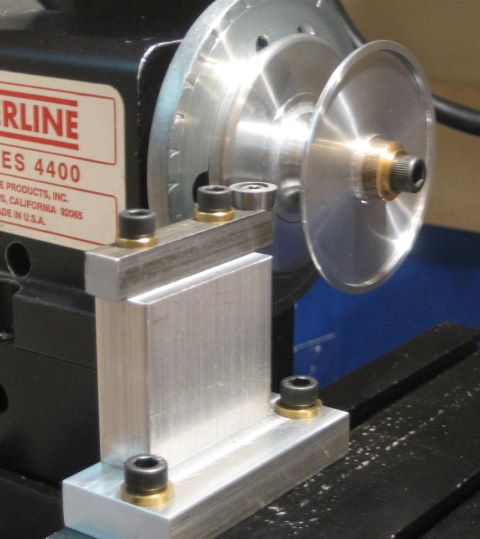
The deepest turning is done with this custom tool post. It uses a 3/8 inch diameter carbide insert.


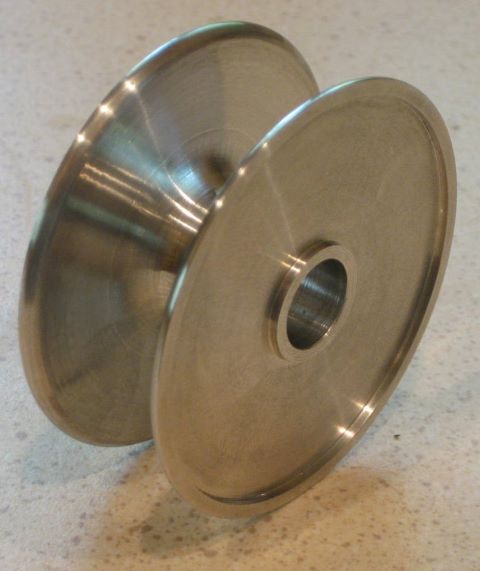
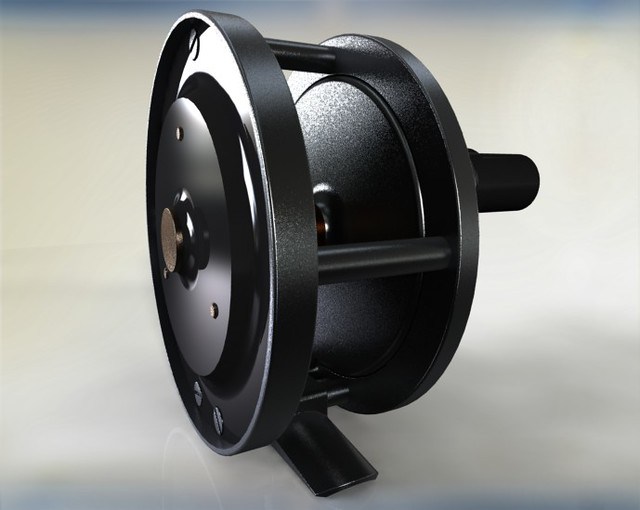
Here is the finished spool (not yet ported or anodized). This was less difficult that I anticipated.


The raw material weighed 5.6 oz, and the spool (not yet ported) weighs 0.85 oz. So 85% of the material was turned into chips.

Posted in Milling, Spool, Turning | Leave a comment

Milgrain Tool

On the tool post is a milgrain tool.

More specifically, it is a lathe milgrain tool, to distinguish it from even smaller milgrain tools used by jewelers. This tool has a one quarter inch diameter wheel and a one eighth inch square shank. It is “female” pattern. There are also “male” and “rope” patterns available.

It is used as a knurl tool, pressed into the work.

I turned the spindle by hand.

Here is the pattern produced.

Before applying the milgrain tool, I made two grooves with the point of a carbide insert.

My plan is to use it to add decorative touches to a new reel design.

Posted in Forming, Tools | 4 Comments

A Lesson in Burr Removal

When metal is cut, a sharp edge is often left. Part of making a useable product is removing any sharp edges or (even worse) burrs. Even very small details of parts may have detrimental burrs.
——
When I developed my first reel design (this blog 13 Jan 2011), there was the problem of choosing materials for ratchet and pawl. I undertook testing (summary 23 Aug 2011) to find suitable materials for both. I eventually chose Delrin (actually, acetal copolymer, almost the same) for the pawl. I ran many pawl materials against a bronze ratchet.
Once I knew that Delrin would be the pawl, why not Delrin for the ratchet also? I already had made bronze ratchets for my first 5 reels, and the combination had tested well, so I went ahead and built the five with the bronze ratchets.

By now the reels have had some use, and I have been able to see how two have done. Both had the same problem: the pawls were being consumed. They were shorter than when first made, and the tips did not look as if worn in my gearmotor testing. They looked as if they had been machined away. Here is a bronze ratchet, with a pawl that is .020 shorter than when first made.

The total depth of the 36 DP teeth on the ratchet is .060, so the wear is very signficant.

So why did my testing fail to predict this? I had to think about it for a while, but finally realized the tooth tips of the bronze ratchets were different from those of the ratchet in my tests. The test ratchet had already been through testing with a variety of metal pawls. Some ratchet wear had occurred, effectively burnishing the ratchet tooth tips. By the time I started testing plastic pawls, the ratchet tooth tips were nicely smoothed. On the 5 “production” reels, the ratchets were freshly made and had sharp corners at the tooth tips.

So I am recalling the 5 reels for repair: a new pawl and a substitute ratchet of Delrin.
By the time I made parts for my second reel design (see 10 Aug 2011), I was using Delrin for the ratchet also.

Posted in Click, Milling, My Reels, Ratchet/Gear | 2 Comments

Spring Mayflies

My house is 200 feet from the river bank, and so attracts a few mayflies if lights are on in the evening.

The night before last, some dark colored duns came to the screens. 36 hours later, they are molting into spinners. I measure this one as 0.42 inch long (Dark Hendrickson ?).

Now today we have a few samples of another species, 0.34 inch long (Sulfur ?)

Posted in Bugs | 1 Comment

3D Modelling

An engineering student at Washington State University, Keenan, has gained some proficiency with the 3d modelling software “Solidworks”.

I don’t believe that he is a fly fisher, but somehow he stumbled across this blog, whereupon he decided that one of my reel plan sets would be good material for 3d modelling.

I hope that he also has time to get his homework done.

He has re-created all the reel parts as 3d models, and then made an assembly of the parts.

To create these images, he used the “rendering” feature. This applies light sources to give the appearance of a photograph.

Maybe I should quit machining reels, and just draw them.

I was an engineering student in the fall of 1967, and took an “Engineering Graphics” course. It wasn’t much fun carrying the drawing board and T-square across campus. There was no way to disguise the “nerd” factor.

Posted in Drawing, My Reels | 3 Comments

A Lesson in Thermal Expansion

The “Fixed Spindle Reel” is my first design with a bushing that runs the length of the spool. I make the bushing of either Delrin or acetal copolymer, and it rides on a spindle of stainless steel.

The fit of the bushing length to spindle length has to allow a little end play. The drawings that I produce for the reel do not have tolerances on the dimensions, but I like for the assembly to show an end play of no more than .005 inch. Some that I produced were less than .005, but they turned freely when on my work bench this past winter (ambient temperature 68 F).

On the first warm day this spring, a customer (who is also a neighbor) noticed that his reel spool was dragging more than the ratchet-pawl would cause. I shortened the bushing by about .003 inch and the reel has been OK on the warm days since.

The problem is thermal expansion. Delrin has a thermal coefficient of expansion of .000120 per degree C, while stainless steel is only .000017 per degree C. For the 1.2 inch long bushing and a temperature rise of 20 deg C, the bushing grows by .0025 inch relative to the spindle.

So far I have repaired 3 reels that had room temperature end play of .002 inch or less. It is easy to measure the end play by pushing a feeler gauge under the head of the front screw.

If any other reel owners have this problem, please contact me for repair.

Posted in My Reels, Repair, Spindle | Leave a comment

Boring Tool Holder

This plain aluminum block is a quick-and-dirty holder for round shanked boring tools.

I have been struggling with this holder for some time. The problem is that it fastens to the cross slide of the lathe with a single screw. The cutting force at the tip of a long boring tool puts a lot of torque on the axis of the screw, frequently rotating the block.
This block has two holes for tool installation because the first one was botched.

Here is my new holder for boring tools. I expect to have no further problems with rotation.

Posted in Fixtures, Turning | Leave a comment

Line Volume

I have some friends who are interested in small reels. This fits well with my machining resources, as my lathe and mill are quite small (Sherline). So I am working on a new design that can be made in several sizes.
An initial step in the design is deciding spool size. For this, refer to an earlier post (19 Feb 2012) wherein I developed a formula for spool volume to be allowed for various sizes of “weight forward, floating” lines. The formula is
V = 0.28 * W + 1.42
where V is volume in cubic inches and W is the line weight (e.g., 5 for WF5F). Additional volume for backing is added separately at 1.1 cubic inches per 100 yards.
Now I am not claiming that this is an exact science; there are individual preferences about how full a spool should be, and some variation between line manufacturers and models. The formula is just my guide, and so far I am satisfied with it.

So here is my initial decision on spool sizes.

Small amounts of backing are considered here. I am still waiting for the trout that takes me to the backing, but I do not like to tie the fly line directly to the spool.

I am wading (figuratively) into new territory in considering 0, 1, 2 weight lines and this makes me uncomfortable. To build confidence, I decided to measure the volume of a small line.
Here are two measurement spools; one is 1.70 cubic inches for a WF1F and the other is 2.54 cubic inches for WF4F (zero backing in both cases).

I bought a new WF1F and borrowed the WF4F from one of the reels that I use. The WF1F is an Orvis “Wonderline Generation 3” and the WF4F is of obscure origin.

Here are the spools with line wound on.

The WF1F took up 1.26 cubic inches and the WF4F took 1.61 cubic inches. The spool with 4 weight has the amount of fullness that I prefer. The 1 weight spool seems to me a little too full, but many people would not agree. I was surprised at how large the WF1F line is.

Rather than revise due to this new information, I am going the leave the design table as it is. If I ever want to fish a 1 weight line, I will make a “size 2” reel for it. One of my friends has a source for silk lines, and may want the “size 0” reel for a 1 weight silk line.

Update (same day): Finished with the post, then installed the WF4F and only 3 yards backing on the smaller of my “Fixed Spindle” reels, which has a spool volume of 2.46 cubic inches.

Looks to me like a good fit. Others would use more backing. I originally promoted this as a reel for WF3F.

Posted in Spool | Leave a comment

One Reel Available

I have completed all orders for my “Fixed Spindle Reel” and now have one complete reel left.

Sold as of June 2013.

Posted in My Reels | Leave a comment

A Loss of Concentration

This was to be the front spool end of a reel.

The very last machining operation is to plunge mill 10 larger lightening holes. It is a repetitive operation; plunge, index 30 degrees, plunge again. But at this radius, the part already has two countersunk holes meant for the knob and counterweight screws. So while my mind was in AUTO mode, I wiped out one countersunk hole.

I write this blog more for myself than for any audience. By carefully documenting stupid errors, I might better avoid them in the future.

Posted in Spool End | 2 Comments