
When I made my first reel, I used wet/dry sandpaper to remove tool marks on the aluminum parts. On lathe parts such as rings and spool ends, I started with 320 grit and progressed through 600 and 1200 and ended with 2000 grit. Mill parts such as feet have coarser tool marks, so I started with 180 grit. Some liquid is needed to keep the paper from filling up with aluminum particles, and it seems to me that water is about as good as sewing machine oil or kerosene. When done sanding, I buffed with “tripoli, cut and color” and then had very shiny parts. A highly reflective reel is not necessarily a good thing to carry on a trout stream; I found that anodizing reduced the shine (see post of May 4, 2010).
In making a group of 5 reels, I wanted a faster way to get to the end state. So I bought a Lyman vibratory tumbler that I had read about on Michael Hackney’s forum. This tumbler (Lyman 1200 Pro Turbo Tumbler) was designed to clean brass casings when reloading ammunition, and is widely available in e-commerce. 
For media I bought “1/4 inch plastic pyramids” from the jewelry supplier Contenti. These come in medium and extra fine grits; I tried both. The largest part that I have to tumble is a ring of about 3.1 inch diameter. I do these one at a time because two or more in the basin will ride up against each other. I found the tumbling action to be satisfactory for this ring, but if you had a 4 inch ring for a salmon reel, I think it might wedge. I tumble 5 or 6 cranks or feet all at the same time. I fill the tumbler basin about 1/2 full of pyramids and add 1/2 cup water. After tumbling a load, I rinse the media to remove debris. Lathe parts get a uniform matte finish in about 2 hours. Milled parts need sanding with 180 grit paper before tumbling, or else it takes forever to remove tool marks.
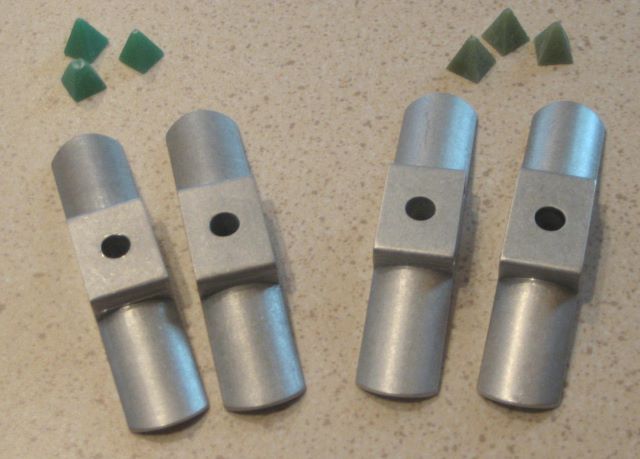
The last photo here shows 4 tumbled reel feet. All were tumbled with the medium grit pyramids, and the two on the right got further tumbling with extra fine. It is a barely detectable improvement. The two outside feet were buffed with tripoli, another very small improvement.
I will use the fine pyramids on all my parts, since I have them. But doing it over again I would not buy the extra fine grit. I am satisfied with the uniform matte finish. If you are doing just one reel at a time, don’t bother buying a tumbler.
If you want to use more than one media with the Lyman 1200 tumbler, you can buy an extra basin as P/N 7631323.
Regarding buffing: I do this with a 6 inch wheel mounted on my bench grinder. It is easy to get way too much compound in the wheel, and then black deposits are left on your parts. Eastwood sells a “buff rake” that helps restore the wheel condition; you can find this on Ebay or Amazon. I bought some 2 and 4 inch buffing wheels thinking that I could use them on my Sherline lathe (2300 rpm max.), but it turns out that the surface speed is not high enough.
Update (15 March 2011): After anodizing a couple parts, I was not happy with the appearance. So I decided to try to get a shinier surface. I bought 5 lb. of walnut shell and 1 lb. of rouge from Rock Shed.
I put 2.5 lb. of walnut shell in my extra tumbler bowl, and added about 1/3 cup of rouge, which was probably more than enough. After 24 hours of vibration, the parts had a much finer finish.
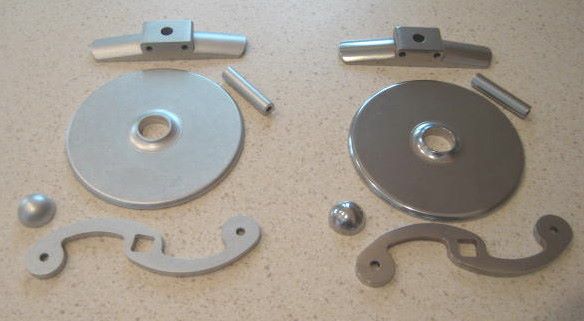
Left: parts after tumble with pyramids. Right: after additional tumble in walnut shells.
They are perhaps too shiny at this point, but I know that anodizing will tone them down. So the recipe for aluminum finishing is
1. Sand to remove all tool marks. 320 grit is probably fine enough.
2. Tumble (vibratory) with plastic pyramids 2 to 4 hours.
3. Tumble with walnut shell and rouge for 24 hours.
The rings of my reel are about 3.1 inch diameter. They tumbled OK in the plastic pyramids, but with the walnut media they continually struck the bowl and made a lot of noise. I would now say that the Lyman 1200 is too small for parts of this size, but OK for foot, spool end, crank, etc. Larger tumblers are available. Fortunately, it is not too difficult to finish round rings by hand; chuck on lathe and apply the several sandpaper grades.
Tip: Before putting pillars (or other parts with small holes) in the tumbler, plug the holes with screws. This will save much time, by keeping walnut shells out.
Update (8 March 2012): My procedure continues to evolve. For the aluminum parts of my raised pillar “aluminum frame reel”, I proceed as follows.
1. Machine the part, making the finishing pass just 0.001 inch. This minimizes tool marks because there is little vibration of the mill/lathe frame. I machine without lubricants/coolant, so the freshly machined part is quite has no oil to interfere with anodizing.
2. Wet sand with 180, then 320 grit and water. For the circular faces of end plates, do wet sanding on the lathe.
3. Tumble 2 hours with medium grit plastic pyramids, then 2 hours with extra fine grit.
4. Wet sand with 1200, then 2000 grit, then with a 3M Trizact pad (3000 grit). This replaces the walnut shell and rouge tumble, and takes much less time. I found that the rouge was carrying over into my anodizing solution, despite careful cleaning. And walnut shell alone is ineffective. I have also left out buffing; just another opportunity to work wax or grease into the surface of the part. At this point the part is not as highly reflective as before, but after anodizing it comes out the same.
5. Clean with dish detergent and then with spray degreaser.
6. Anodize.
Update 20 Nov 2012: Use enough water! Using only 1/2 cup as I mention above causes foaming. Instead, fill the tub to about half the level of the media.
