
This post isn’t about machining fly reels, but North Branch Reels is the only blog that I have. This is about making furled leaders, a craft that takes less equipment and less skill than tying flies.
Furled leaders have no shape memory, so they don’t curl up like monofilament and create wind knots. Also, they don’t stretch when you pull a fly out of a tree branch, so there is less tangle.
I make furled leaders by the method given by Claude Freaner. This post provides supplementary information, photos and a diagram, that may be helpful.
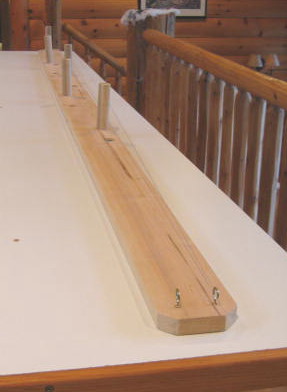
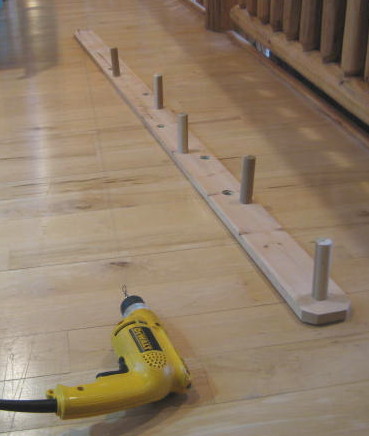
Here is the fixture, a 1×4 with five dowels and two cup hooks attached. Thread has been wound on; I use UNI-Thread 6/0 (a popular fly tying thread). I once tried using 2 pound monofilament but got kinks during twist. The UNI-Thread has proven itself absolutely durable; I have had no failures in 8 years. It comes in 200 yard spools, and this is enough to make 5 leaders.

This is the pattern for winding thread onto the fixture. Particularly important is the interlocking of loops at four of the dowels. This is why the dowels are 1 inch diameter; it lets you easily drop the thread spool through. Note that runs 11, 17, 22, and 28 go past one post and on to the next.
Here one side of the butt has been gathered on a fishing snap and the leader has been unfolded. It is ready for the first twist. Near the middle of the unfolded leader I have attached a 4 oz. lead weight (also on a snap). It does nothing during the twist, but is a valuable third hand after the twist when the leader is re-folded.

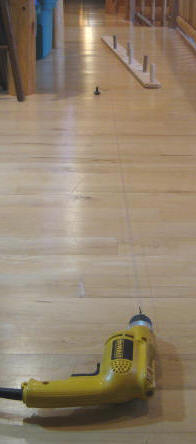
This is a detail at the drill, showing a cup hook chucked in the drill, and the snap.
Here the first twist has been made and the leader re-folded so the second twist (reverse direction) can be done.

Both twists are now done, and the weight has been reattached. It is hanging at the end of the leader, which is untwisting somewhat as it relaxes.
Here are the two ends of two different leaders. At the top is the tip and butt of my leader. I have made a Shorb Loop at the tip. The butt is secured with an overhand knot. I will cut this knot off after I have nail knotted the leader to the end of a fly line. The trick to making a neat nail knot is to NOT use a “nail knot tool”. Instead, use a loop of thread or monofilament to pull the tag end back under the coils. When I add tippet, I use loop-to-loop connection.
At the bottom of the picture are the two ends of a leader that I recently bought from Streamside Leaders. This is a more elaborate assembly. There are two colors of thread, which gives a snazzy appearance that may even provide camoflage. A loop has been formed at the butt, useful if you want a loop-to-loop connection of fly line to leader. I do not know how this was done. Several inches from the tip, there is a transition from thread to monofilament. I don’t know how this was done, either (or why). I detect no knots where monofilament begins and ends. Finally, a small metal ring is at the tip, and this may be helpful for loop-to-loop attachment of tippet.
Additional Note 8 June 2014 : I have a 2500 rpm electric drill and have been running 1 minute on the first, double length twist. Then 20 seconds on the second, folded twist.
Additional Note 1 Nov 2021: The Shorb Loop reference above longer exists, so try https://flyforums.proboards.com/thread/8480/shorb-loop-furled-leaders.). Here is my own photo illustrating the formation of the loop. The tool is a “Knit-Pick” from a sewing/knitting store.
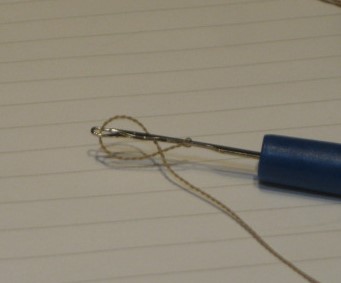
Procedure: Push Knit-Pick point between the two thread bundles about 1 inch above the leader tip. You have to untwist a 1/4 inch section of the leader in order to get the tool inserted. Push the leader up the tool shank past the latch, then grab the end loop and close the latch. Pull the end loop through. Push the end loop up the tool shank past the latch, then grab the newly formed loop and close the latch. (Photo illustrates this point.) Pull through and stretch out the final loop.

Pingback: The K’Nex Furling Machine | North Branch Reels