
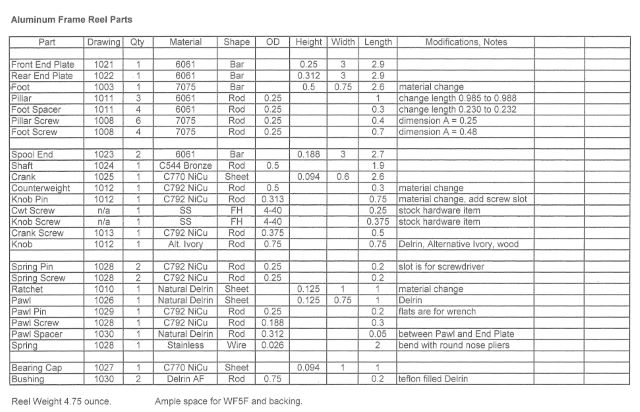
I have been machining parts for the Aluminum Frame Reel from a few finished drawings, but mostly from sketches on yellow lined paper. It is time to put together all the drawings, so next year I can still figure out what I did. Here is a reference table for the parts and drawings.
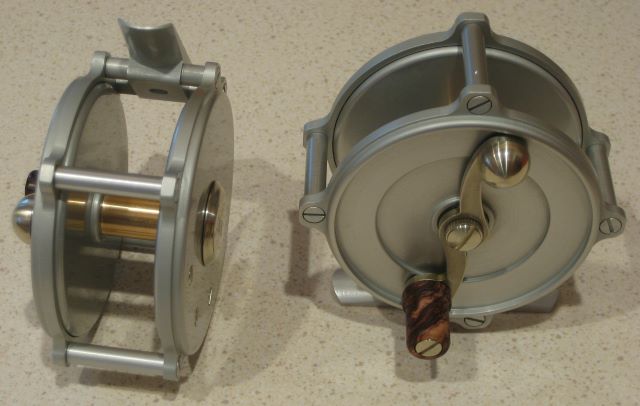
Construction Notes for Aluminum Frame Reel
Much supplemental information on making this reel is in my blog, http://northbranchreels.com or https://northbranchreels.wordpress.com. When a note below includes a date, look at the blog for that date. Note the “Archives” and “Categories” widgets on the right side of the blog page, they will help you find things.
Many parts for this reel are borrowed from my earlier design. The notes that follow describe any modifications to those parts. You can purchase a hard copy of the plans at The Eclectic Angler, or just view the drawings (lower resolution) on this blog (7 May 2011). Drawings 1000 through 1018 are in the old plan set and 1021 through 1030 are given here.
Drawing 1003, Foot
To make a stronger/harder foot, I have switched from 6061 to 7075 aluminum (21 Sep 2011). Drawing 1003 lacks the overall length of the foot, which is 2.50 inches per the AFFTA reel foot standard. Also see 25 Sep 2011, 28 May 2011, 28 Sep 2010.
Drawing 1008, Screws
Shorten 6 pillar screws from 0.30 to 0.25, and 4 foot screws from 0.53 to 0.48. See 18 Nov 2011 on threading with a die.
Drawing 1010, Ratchet
Change material from bronze to Delrin or Acetal Copolymer. I have switched involute cutters from #4 to #8 to get a rounder tooth, but this is not very important. This is a ratchet and not a gear so profile is not critical. Grinding your own “one tooth” cutter would be a reasonable approach. 10 May 2010.
Drawing 1011, Pillar & Foot Spacer
Increase pillar length from 0.985 to 0.988, and spacer length from 0.230 to 0.232. This is more of an accounting issue than a significant dimensional change.
Drawing 1012, Crank Parts
Change Counterweight and Knob Pin from aluminum to nickel silver. Add a screw slot to the pin, 0.040 wide by 0.035 deep. Knob could be made from Alternative Ivory or wood.
When the counterweight was made from aluminum, it did not balance the knob and aluminum knob pin, but the parts were light enough that there was no problem. When the counterweight and knob pin are made from nickel silver (as here) there is a good balance. (13 Dec 2011, 18 Jul 2011, 15 Oct 2010).
New Drawing 1021, Front End Plate
New Drawing 1022, Rear End Plate
See blog 2 Nov 2011 and 12 Nov 2011. Set angles carefully and use rotary axis lock on table.


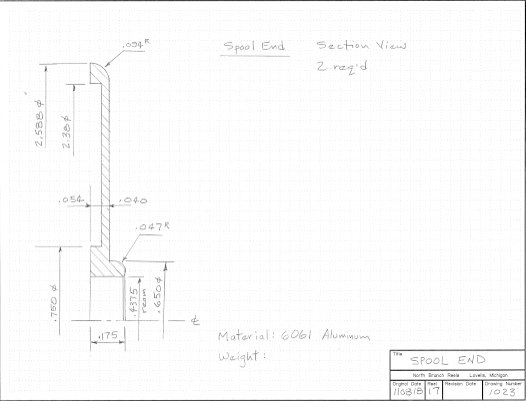
New Drawing 1023, Spool End
See blog 17 Oct 2011 for fixtures.
New Drawing 1024, Shaft
Drill and bore 2 parts, join, then machine outside diameters (13 Oct 2011). The drawing shows that the two parts are to be brazed together, but I now think that it is better to bond them with Loctite 609 (23 June 2011).

New Drawing 1025, Crank
You will need a tool plate similar to Drawing 1014 (4 Oct 2010). But the arc centers here are different, so the tool plate holes have new locations per the new drawing.
If you wish to be correct according to EVH, you will learn that this crank is RHW, and should be turned over (i.e., countersink other side) for LHW.

New Drawing 1026, Pawl
Delrin or Acetal Copolymer (11 Apr 2011). I make this by first drilling the hole, then screwing the blank to a post on the rotary table. After that, just make passes on the mill.
Pawl as drawn is for left hand wind. For RHW, either make an opposite hand pawl, or just turn it over in the assembly.

New Drawing 1027, Bearing Cap
A place to engrave your logo, or a serial number. See 6 Dec 2011 for mandrel. Make the concave arc with a round file. Attach to Rear End Plate with Loctite 609 (and 7649 Activator on the anodized aluminum).

New Drawing 1028, Click Parts
View assembly 17 Dec 2011. Run screws into threading die as far as they will go (18 Nov 2011).
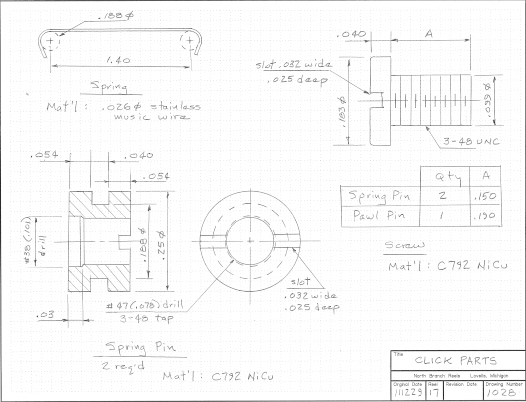
New Drawing 1029, Pawl Pin
Flats are for wrench. #38 drill hole is for clearance of partly formed screw thread.

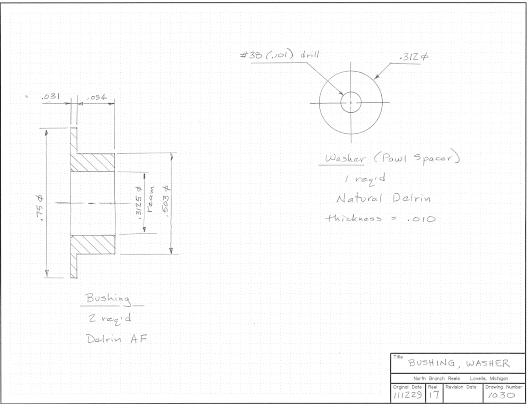
New Drawing 1030, Bushing & Washer
Delrin AF is a teflon filled material. I ream the bore, but end up with a hole smaller than 5/16. That is why the shaft journals are just 0.309 diameter.
Washer is held between Rear End Plate and Pawl Pin, it centers the pawl on the ratchet.
Spool Assembly
See blog 27 Aug 2010 and 23 Nov 2011 regarding bonding with Loctite 609.
Overall Assembly
Threads can be locked with medium strength Loctite or Permatex. But the spool of this reel can only be removed by disassembly, so plan on having to extract a tippet from the bowels and omit Loctite from 5 frame screws on the Rear End Plate.
My drawings do not have tolerances on the dimensions; all parts fit “line to line” as dimensioned (hence the tiny length adjustments on drawing 1011). The first time that you screw everything together, the spool will probably be locked up in compression between the bushings. Shave the bushing flanges to get a little clearance. You can hold the End Plate/Bushing assembly in a 3 jaw chuck while doing this on a lathe.

Dave, Getting ready to make an aluminum frame reel like yours and now have plans to follow to do so.
Thanks for the plans,
Leroy……………
would you think about a tutorial showing the the machineing of a reel your blue prints are on the money .like they say a picture is worth a thound words just a thought keep up you wonderfull work.
thank you
Richard Westerfield
Richard,
Thank you for the compliment.
I consider this blog to be the tutorial. Most of the posts since April 2011 have considered various parts of this reel. If you haven’t noticed, I added a “Categories” index at the right side of the page. This helps to quickly locate posts relevant to a particular part.
I don’t think that a more comprehensive effort is justified for two reasons:
1. The audience is small.
2. Home shop machinists are ingenious guys who enjoy figuring out how to make a part. Most of them are more experienced than me and probably have better techniques.
I think that my best contribution is to provide a proven set of plans.
Dave
Dave these are great. I’ve been studying how to make the parts shown in your reel making booklet.
I’ve downloaded and printed the new drawings as well as modifications to the parts requirements. After getting the basic Sherline lathe/mill going I’m now thinking about jigs & fixtures as well as methods. Actually figuring out HOW to make the parts on my own equipment is as satisfying as making the parts.
Between you and John Betts book (which I now am understanding better) I feel comfortable tackling the easy parts first and see how it goes.
Dave the world is a better place because of your willingness to share your hard earned knowledge buffered by your experience. That’s what great teachers do. Thanks again!
Bob,
Yes, much of the satisfaction is in figuring out the sequence of operations to make a part. For some of the more difficult parts, I have text files listing my sequence of operations. This sequence cannot be unique; you may find a better way. But let me know if you would like to see any of these.
I now make the aluminum frame reels without ever using a riser block on the lathe or mill.
Dave
Thanks for the kind offer Dave. I would appreciate your operation sequence notes as I have painted myself into a corner before not thinking things through enough. I have enough real and mental scar tissue to appreciate real world advice. (Should-a done that 50 years ago)
Oh I requested a cutting tool catalog for aluminum, plastics and exotic metals from OMSRUD machine tool co. They describe various machining problems I have had with alum scoring and also discuss issues with plastics and exotic metals. They are quite specific in their selection of the best bits.
No riser blocks! Great. That would be more stuff I don’t need to buy. Makes the Wifey happy!
Regards,
Bob Snare
Broomfield Colorado
robert.snare@earthlink.net
PS: The old GOLDEN BUFF MOTEL and EADS SMOKESHOP in Boulder have been sold. After 100 years progress makes it crummy way to that fair city. But McGUCKIN Hardware still rules!
Bob,
I am travelling but will be home later this week and will send then. Tried to send this msg to the Email address in your last msg, but got automated rejection reply. Please send a good address to dave49@wildblue.net.
From Amsterdam,
Dave